
One might argue that hipsters have claimed avocado toast. But sprouting avocado pits is hipsterdom on a whole different level. There are dozens of articles written on “How to Grow Your Own Avocado Pits”, and this project is all over social media. It’s trendy. But no one tells you how difficult it is to get actual avocados. I hate to be the one to break it you, but unless you graft your avocado saplings when they are mature enough, you won’t be harvesting Hass gold anytime soon. Sorry, I don’t mean to smash your avocado dreams into oxidized guacamole on stale chips.
Ok, technically, you don’t necessarily need to graft your avocado plant in order for it to produce fruit. It will just take much longer, anywhere from 7-15 years (or more), if at all. But even if it does fruit, the fruit grown from seed will likely be inedible. However, it can be done! That’s how the Hass avocado was started, after all. But today, every commercially grown Hass avocado tree is grown from grafted seedlings that have been propagated from the OG tree (now deceased). A newly grafted avocado sapling will take only about 5 years to start bearing fruit. It’s like, expediting nature.
More on grafting later.
First, let’s talk about how much fun it is to sprout an avocado pit, and how to do it! (FYI, I’m not a hipster and I know you probably aren’t either… the context just begs for it!)
This past spring, I successfully started two healthy avocado trees from seed!

It took multiple attempts. And I won’t lie, it wasn’t super easy. I know some of the online tutorials are written for third graders, but I’m a skilled pseudo-botanist and found it challenging! It definitely involved some trial and error.
At first, I attempted to grow my pit on a windowsill in the middle of January at my redwood cabin. Nothing. Nada. Not going to happen. It wasn’t warm or humid enough. Also, following common sense, I thought to myself, “Well, if an avocado tree certainly wouldn’t grow here, what makes me think an avocado pit would sprout here?” Good logic.
This pit was unsuccessful.
I decided to try again, but with four pits. I brought them to my greenhouse space, in order to give the pits as much of the environment the mature tree would favor. I stood a fighting chance.
Pro Tip: Make sure you attempt to sprout your pits in an environment similar to that favorable by the mature tree.
March 8th, 2019 – Pit start date
One week later, I saw buds forming inside the pits!


I planted them in soil after about 3 weeks. Planting the pits in soil allows the roots to soak up the necessary nutrients while they’re establishing, allowing for healthier seedlings.

April 13th, 2019 – Tiny bud with small roots forming


Look at them roots, y’all!
To summarize:
How to Start an Avocado Tree from Seed
(I’m sure this is one of hundreds of lists like this, but I hope to provide you a more practical guide. Also, please read my propagation rules here on harnessing patience, confidence, and forgiveness.)
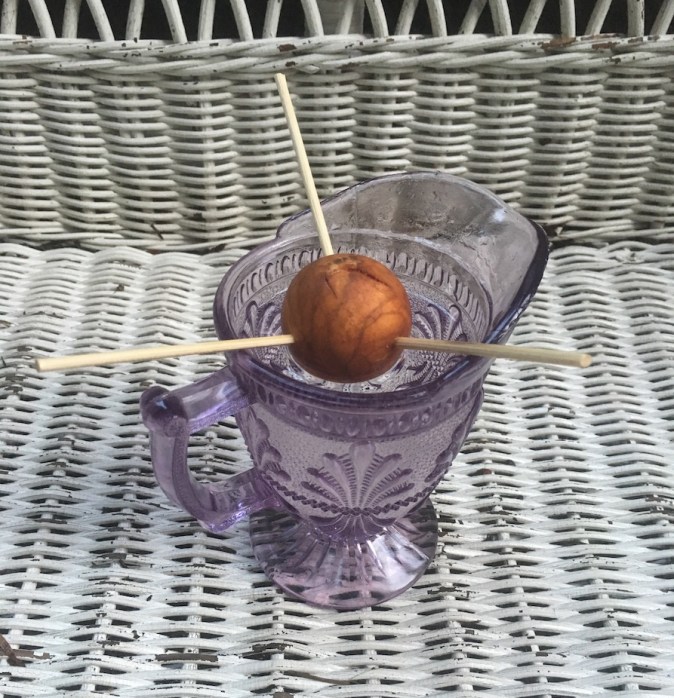
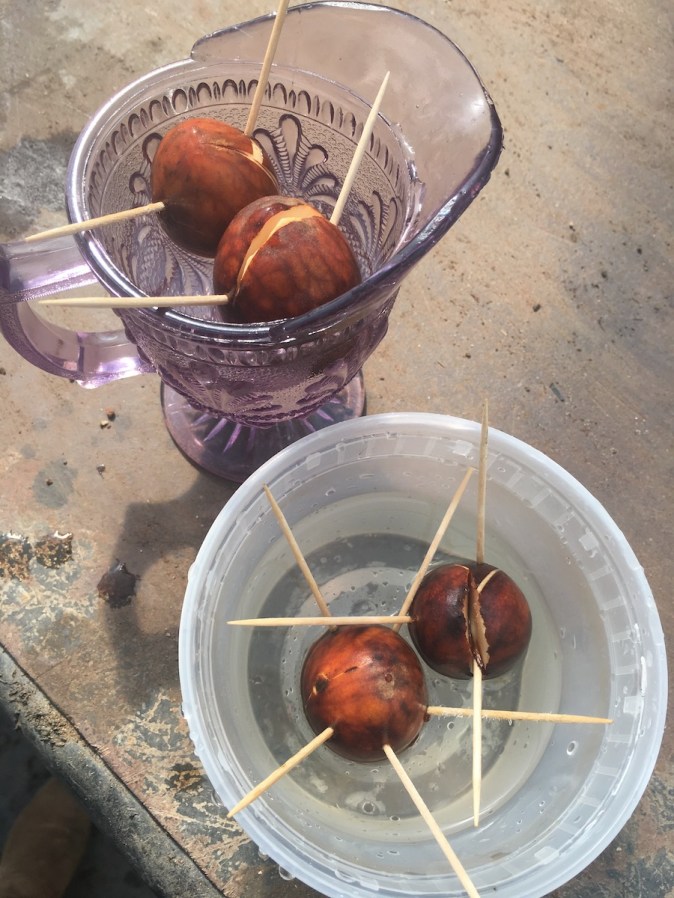
- Eat all the avocados. Take their pits – not just one, but several. Attempt more pits than you actually want to grow. This will increase your success rate.
- With the wider end of the avocado pit at the bottom, poke wooden skewers or toothpicks in the pits at an upwards angle and suspend the pits over a vessel of water. They should be halfway covered with water. They will eventually split on their own.
- Put them in a humid, warm place with indirect bright light.
- Wait patiently. Sing to them in avo cappella.
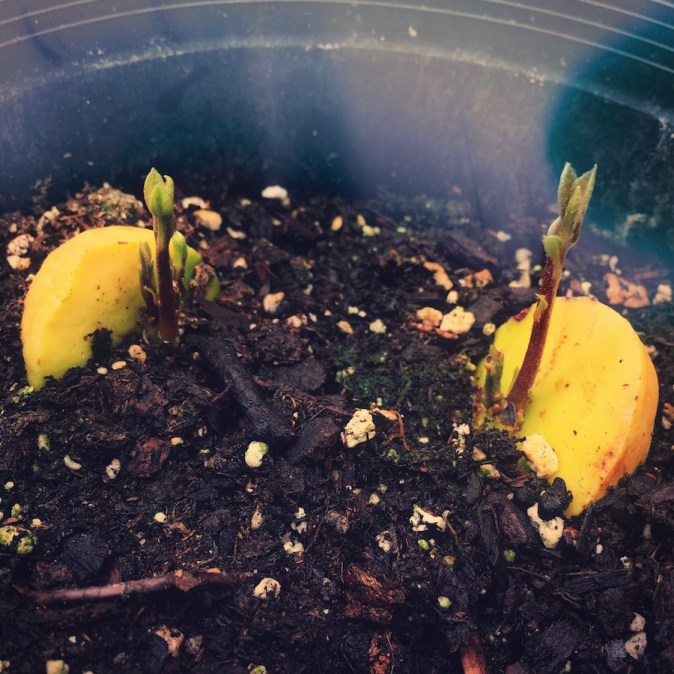
- After 3 weeks, plant the pits in a nutrient-rich soil (I used 2:2:1 potting mix:peat moss:compost). The downside to this is that you won’t see the roots grow, but the upside is that your plant will be healthier due to the nutrition in the soil.
- After the pits are planted, mist once per week for two weeks, then water regularly (2x per week).
The sprouts may not come up right away, but be patient, they will! Mine took a while. Three months to be exact.

June 11th, 2019 – Sprouts coming up!
One week later, they started taking off!
June 19th, 2019 – Sprouts taking off!

")
This pot was a 1 gallon size with two pits in it, which was ultimately too small, so I went ahead and transplanted each seedling into their own 1 gallon pots.
Onward and upward!
For a more in depth journey progress vlog series, watch my Instagram stories ‘Avocado’ highlight.


Little did I know, my avocado experiment turned into a lifelong project, since I do plan on growing these babies to maturity and planting them in the ground. I will never be able to live somewhere lower than agricultural zone 9b! I’ve been reading all I can about grafting fruit trees, and it’s so fascinating to me to learn about the genetic differences between seeds and fruits. The avocado fruit you spread on your toast is genetically different than the pit inside. The pit contains a reshuffling of the genomes from its parents. The avocado pit sprouts and turns into a sapling with its own rootstock, which starts over the fruiting life cycle. Grafting that rootstock with a scion of a mature variety will speed up the fruiting cycle significantly, resulting in more reliable fruit. But of course, in order for the new grafted tree to fruit, it needs to be pollinated.
Avocados are hermaphrodites, meaning they have both female and male organs in their flowers. However, avocados don’t usually self-pollinate, since their female and male flower portions are not open at the same time. They follow a flowering phenomenon known as synchronous dichogamy. The flowers open first as female in the morning for 2-3 hours, are ready to receive pollen (but to no avail), then close for the rest of the day and evening. The next day, the flowers open as males and release pollen for several hours (but the stigmas are no longer open). So how do we get around this? There are “A varieties” and “B varieties”. “A-type varieties” of avocado flowers bloom female in the morning on the first day, then bloom male in the afternoon the next day. “B-type varieties” bloom female in the afternoon on the first day, then bloom male the next morning. With hundreds of flowers blooming day after day on a continuous cycle, the flowers can be pollinated, but you’ll need more than one avocado variety.
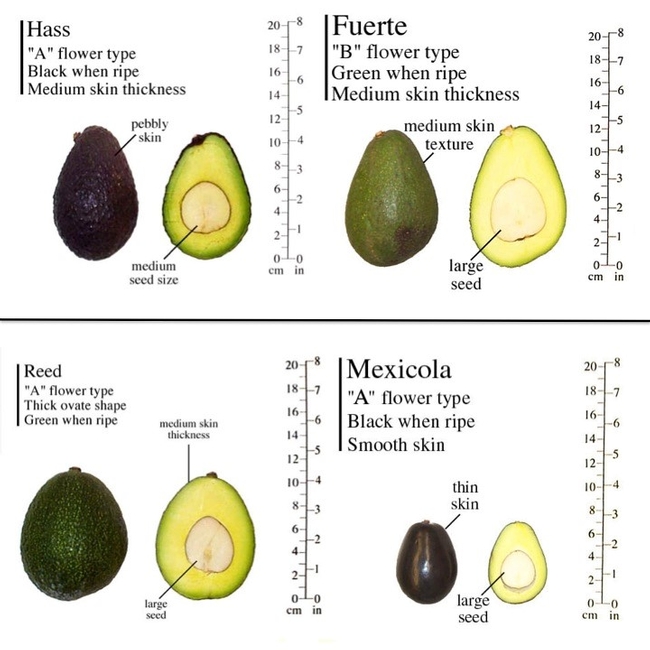
Avocado varieties by “A” and “B” type flowers
This figure is from an amazing source¹ from UCANR, an agricultural extension blog written by University of California experts in subtropical horticulture.
Recommendations for further reading will be at the bottom of this post.
Ok, so I was successful enough to sprout my pits, and I’ve been keeping the young saplings alive. I’m serious about starting my avocados from seed the right way, so once they are about 3 feet tall, I’ll need to graft them. Have I ever grafted anything? No. Does that matter? No! My friend told me the other day, “If there was anyone who could teach themselves how to graft an avocado tree, it would be you.” And besides, you can learn anything on YouTube, right?
I even have my avocado scion connections set in place. I have a friend who owns a property with fruiting Hass and Fuerte avocado trees, and she has agreed to let me graft my avocado plants with hers! So since I have two avocado saplings, I plan to graft one of each. That way, I’ll have one with “A-type” flowers, e.g. Hass, and one with “B-type” flowers, e.g. Fuerte.
Once I’ve crossed that bridge in 1-2 years, I’ll check back in on here and write a fruit tree grafting tutorial of my own. Does anyone have experience grafting fruit trees?

Since this project was so successful, I’m doing the same with mango pits as well!


Recommended Reading:
- UCANR (University of California Agriculture and Natural Resources): Topics in Subtropics “Avocado Cultivars, Botanical Races and Genetic Footprints”
- “The Remarkable Avocado Flower”
- U.C. Cooperative Extension “Answers to frequently asked questions about Avocados”
~CRK.
If you enjoyed what you read and don’t ever want to miss a post, securely sign-up for my e-mail list here.
All photo rights belong to Cristie R. Kiley. Please ask permission before taking.

As you probably have noticed, the blog has been pretty quiet as of late. But I’m still here! I’ve actually been hard at work designing inventory for my up-and-coming plant decor brand. I’ve shared with family, friends, and close-knit communities on my social media accounts and e-mail newsletter, but I haven’t been officially public about it yet. I’m sorry if you’re the last to know! But even if you are in my inner circle, you’ve probably only seen small snippets, heard vague details, and probably have no idea what I mean by “plant decor brand”. Now is the time that I clue you in on what I’ve been up to!
I will absolutely be keeping up with writing for the blog, and I always have content brewing in rough draft form, but my focus lately has been on making art for Xylem Rising. Xylem Rising is more than an online plant resource. Yes, I will continue to provide experience-based plant care tips and tutorials for my plant community, but my vision for Xylem Rising is way beyond words, pictures, and videos. It is about the plant-filled lifestyle. The life that plants and communing with nature lets you live. It’s a connection not only to plants, but to spirit. Sometimes this is expressed not only with science, but with art. I will be using my affinity for the arts, design, and craftsmanship to help express the spirit of Mother Nature.
Plant Propagation Mobiles


I will be selling a line of gorgeous “plant propagation mobiles”, designed by Yours Truly. Essentially, they are plant holders made specifically for plant cuttings. Every piece is structurally sound and made to last.
- They’re functional home decor, hung either on the ceiling or the wall.
- They are unique, one-of-a-kind, and handcrafted with care, positivity, good intentions, and love.
- They consist of deer antlers (or driftwood) woven with dreamcatchers and adorned with macrame. The macrame acts as a propping system for vintage glass bottles, and the bottles act as plant propagation vessels.
- The bottles are designed to hold water, and the construction of each piece factors in the weight of the materials involved, the water, and the plants. They are securely supported by their macrame pockets.
- The bottles are designed to be easily removed from their decorative holding system, for the purpose of cleaning the glass and changing out the water.
- Every piece is made with a majority of found, gifted, and thrifted materials.


They’re an education piece. I want to teach everyone about the phenomenon of plant cutting water propagation. It’s so easy, and anyone can succeed at it. Most plants can be rooted by sticking the stem in a vessel of water. Take a Philodendron vine for instance. The stem can be cut below a node, and the cut portion can be stuck in water. If you wait at least one month, you will see new roots form! Or take a Spider Plant. Even succulents can be successfully propagated in water. All plant cuttings should be transferred to soil after 3 months or less. Then the process starts over with a new cutting.
For those of us who already propagate anything green around us, I want to provide a unique yet practical way of displaying these cuttings. Most water propagation vessels on the market sit on shelves or tables. Some are done in cool test tube-like holsters. A lot of people just use whatever vase they have lying around. Well, mine are different. Mine are elaborate 3D hanging sculptures with boho charm. (And they also happen to fit really well with the name Xylem Rising.)
Please note that all animal materials used in my work are sourced ethically. The bones and feathers are either found, thrifted, or gifted. I do not support hunting for sport, recreation, or profit. When I buy my supplies from small online retailers, I always make sure they are cruelty-free.
I have created two large mobiles to completion, and many others (both big and small) are in the design phase; thus, explaining my absence on the blog. I’m a busy beaver over here building my inventory.
Once this project takes off, I will be offering custom work as well!
(Dear Internet, please don’t steal my idea. But if you do, good luck. These suckers are meticulously handcrafted, take a ton of time, skill, and patience, and are not for the faint of heart.)
♥∴♥
Of course, she’s going to need a handmade logo!
I’ve been working on this baby off and on for months now:


It’s a watercolor painting designed and illustrated 100% by Yours Truly. I’ve spent hours on the actual painting, and I’ve spent hours digitally optimizing it and getting it ready for print. It’s been quite the process, and it’s not even finished. But it’s close! Once I have a finished digital file, technically it’s not even done. I’ll still have to incorporate it on self-designed business cards. It’s a lot of work designing your own logo!
It’ll be so worth it!
Aside from actually creating my own logo, I’ve been developing my brand. I’ve thought long and hard about my concept, my visions, my market, and all things business plan. I’ve been structuring my handmade business, and a lot of work has been involved in order to put my vision into a cohesive intention, concept, and execution. A lot of it has to do with what I think YOU, my muse, will benefit the most from.
Botanic-Themed Art Prints

I’m a watercolor painter. The art prints I’ll be selling will be of whimsical botanical illustrations, plant still life arrangements, and plant-themed sayings.
Unique Succulent Planters
Think birdcages, shells, and grapevine balls!
Here is a birdcage I did in the past:


Oracle Cards
I cannot reveal any more, for now. It’s going to be EPIC. My idea has never been done before (as far as I know), and it’s going to involve a Kickstarter Campaign. That’s all I can allow myself to say at the moment. Stay tuned!

‘The Moon’, Alphonse Mucha, 1902
My lifelong spirit work has led me here. I have spent years digging deep within myself, and as I continue to grow, so does my purpose here on Earth. I want to inspire. I want to shine not only the knowledge I’ve learned along the way caring for plants, but share with you the spiritual wisdom I have gained (and continue to!) over the years. It’s all about self-love.
Disclaimer: Transformative healing may occur.
I am not going to preach anything to you. I don’t subscribe to any organized religion. I have respect for each and every belief set, but my focus has always been to discover my highest self. I have a deep connection with Mother Earth, the Universal Spirit, and Humanity. I nurture plants. And I have learned how to nurture my body, heart, mind, and soul. I know how good it feels. I want that for everyone, because we all deserve to experience the power of plants. And who couldn’t use a little more self-care?

Much love to you and thank you for your support,
Cristie
~CRK.
If you enjoyed what you read and don’t ever want to miss a post, securely sign-up for my e-mail list here.
With the exception of the Alphonse Mucha piece titled ‘The Moon’,
All photo rights belong to Cristie R. Kiley. Please ask permission before taking.

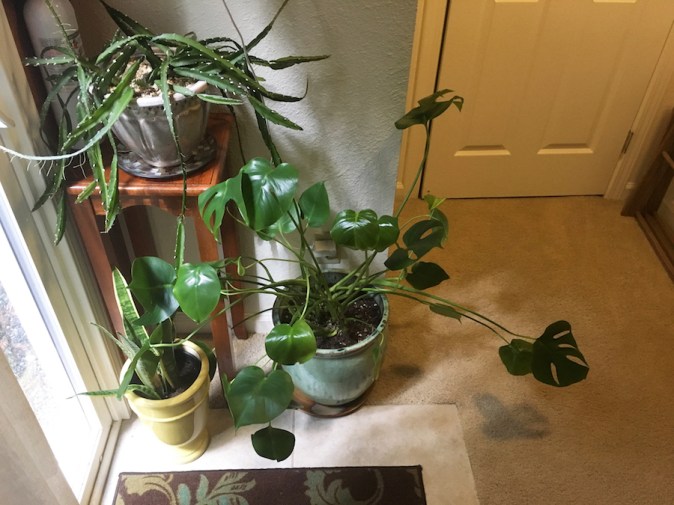
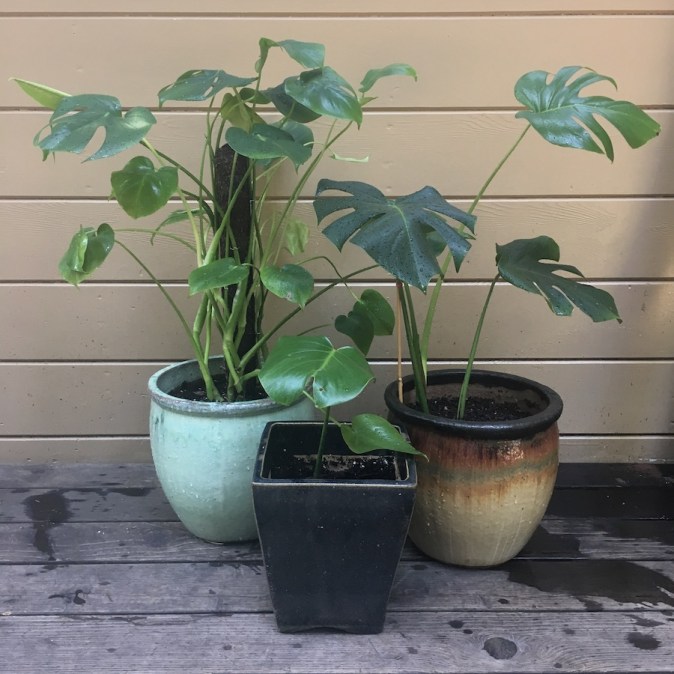
Has your Monstera plant gotten so big that it can no longer support itself? Or do you want to encourage your Philodendron to grow tall and vertical? Consider using a sphagnum moss totem pole for plant support. They are especially helpful for plants with aerial roots. They are cheap, easy to install, and will give your plants the necessary support for optimal growth.

My Monstera deliciosa‘s leaves and stems were flopping all over the place from lack of support. It was unnecessarily taking up a ton of room, and I kept on walking into it every time I entered my bedroom. The leaves were practically on the floor.
I was aware of the handmade extra tall moss totem poles, but I wasn’t familiar with the brand Mosser Lee until I did a little bit of research. Their totem poles are ready-made and contain long-fibered sphagnum moss, which acts as a growing medium for plants with aerial roots. The moss should be moistened prior to installation, as well as continuously. The pole comes in four sizes ranging from 12-30″, and 12″ extenders are provided for adding to the top once your plant reaches the height of the installed pole.
Mosser Lee 24″ Totem Pole Plant Support
$13.33


The pole comes with seven greening pins, which hold the stems in place vertically. They act as a temporary anchoring system. In order to not puncture, scar, or even break the stems, I recommend moving them around as the plant grows.


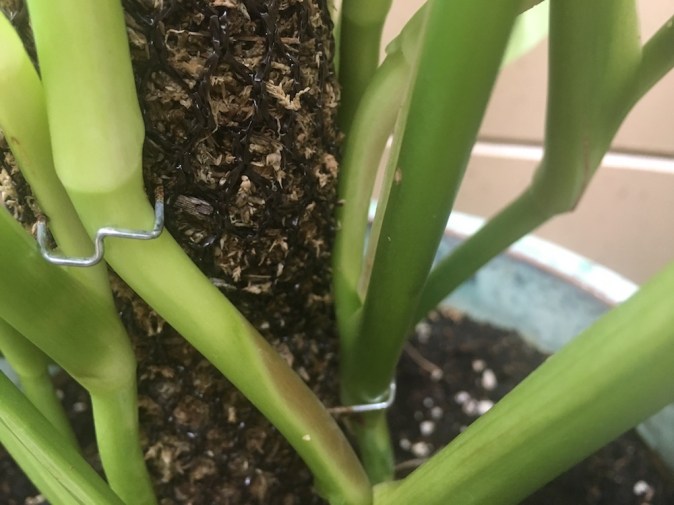
Without too much force, it’s an added benefit to position any aerial roots forming on the stem directly against the pole, to act as anchors. The roots will grow into the pole, locking the stems into place, which helps provide extra support. With this added root support, the plant will be encouraged to grow much bigger than it would if these aerial roots were left sticking out.
Aerial Roots are roots that grow on the above-ground parts of a plant, functioning as anchors. They are almost always “adventitious”, in which they arise from an organ other than the root – usually a stem, sometimes a leaf.

Check out this YouTube video tutorial I made about installing this moss totem pole:
~CRK.
If you enjoyed what you read and don’t ever want to miss a post, securely sign-up for my e-mail list here.
All photo rights belong to Cristie R. Kiley. Please ask permission before taking.
Disclosure: This post contains an Amazon affiliate link, which means I earn a small commission if purchased, at no additional cost to you. This is to simply offset the cost of running this website. Please note that all of the above statements are entirely my own, honest opinions that are derived from personal experience. I would never endorse such products if they didn’t work or if I didn’t see real, positive results. Buy with confidence!
