
Propagating succulents is both a science and an art.
Succulents are some of the easiest plants to propagate, but there are still several tried and true methods to it. Some are more effective than others. What you’ll get from this post are the fundamentals to set yourself up for the best results, along with all of the different techniques you can try.

Before we get started, the three main things you’ll need to keep in mind when doing any sort of propagation are:
Patience ~ Confidence ~ Forgiveness
Not what you would expect, huh? In addition to the knowledge of propagation techniques, these three qualities pay off in a huge way.
Patience
Propagation is a waiting game. It takes a lot of time, and you need to know that before you go in. Just because something doesn’t grow roots within two months, doesn’t mean it never will. Keep waiting. You don’t stand over the stove waiting for water to boil, do you? Well, you might (no judgement), but it’s not going to boil any faster. Sure, there are things you can do to expedite the process, like adding salt to the water. The same goes for propagation. Temperature, season, and environment all have an effect on the speed of propagation, and I will do my best to walk you through everything, but still, it will be a waiting game nonetheless. It’s hard to tell just how long you might have to wait, and that can be frustrating at times. So channel patience. Don’t give up. Famous words from 1970, “There will be an answer, let it be.”
Confidence
Don’t worry about getting it perfect this time, or that time. Chill. Think of it as a fun experiment that may or may not work out. Nobody is judging you if you don’t get it right, and your self-worth is not defined by the success of a little propagation experiment. It’s important to keep a light-hearted approach and be easy on yourself. While there are basic guidelines to follow when propagating succulents, you could follow all of them and still not get something to root. It has nothing to do with you. You could be doing everything right but be totally unsure of yourself the whole time, anxious if your propagation project will turn out alive. Then low and behold, a few months later, things grow healthy white roots and establish themselves quickly. All that needless worry, for nothing. I have a personal story about this that I’ll share in a little bit.
Forgiveness
So let’s say you’ve channeled all the patience and confidence possible, but your propagation experiment failed. It’s not the end of the world. Forgive yourself, and don’t beat yourself up over it. And most importantly, don’t let that stop you from trying again.
Here’s an excerpt from one of my favorite poems:
“This means there are no mistakes. You might do it differently this time, but that’s because you did it this way this time. Perfect, even if you say too much this too little that. It’s you and please be yourself. Offer yourself. Feels good. Ok?”
-Tassajara Bread Book

Alright, so enough with all the metaphysical stuff. Here’s how you actually propagate succulents…
Methods of Propagation
Succulent propagation is usually done by individual leaves, but it can also be done by full heads or stem cuttings.
Soil | Water | Air |
| Leaves, heads, or stems planted directly into soil | Leaves, heads, or stems placed into a vessel of water | Leaves, heads, or stems left out flat, with complete exposure to the air |
| Leaves, heads, or stems laying on top of soil, unplanted | — | — |
All of these methods work for simple leaf, head, and stem propagations, but there are other complicated methods of propagating, such as coring or grafting, which are done for very specific types of succulents. Coring is the best method for propagating Agaves. Read my species info on Agave ‘Blue Glow’ for more information. Grafting is the best method for propagating “Moon Cactus” (Gymnocalycium mihanovichii) and certain types of Euphorbias. Read my species info on Euphorbia lactea ‘Cristata’ f. variegata for more information.


These are the succulent propagation weirdos. But let’s keep it simple, shall we? I’ll be covering how to propagate the majority of succulents via soil, water, and air.
Of course, propagation by root division is sometimes an option, which is when you divide the rootball. Usually root division is done by separating the new growth offshoots from the main rootstock, but you can also simply cut the plant in half, or in quarters.
Soil
Forget your rooting hormone. You don’t need it. Here are the soil propagation methods that work great for me:
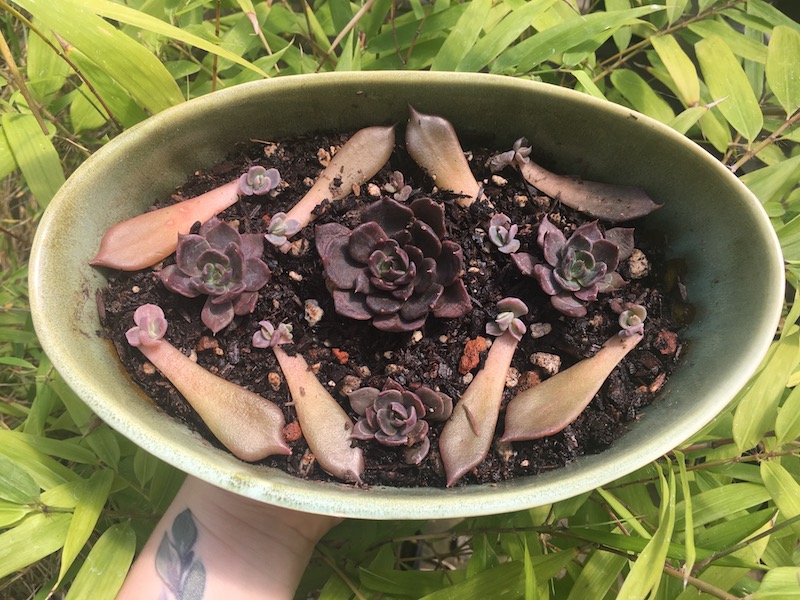
Leaves, Heads, or Stems Planted Directly Into Soil
It is possible to root succulents with healthy roots by just planting them directly into soil. This can be done with individual leaves, full succulent heads, or short stems.
-
- LEAVES
-

- HEADS
-

- STEMS
Even when there are absolutely no roots formed yet, it works! However, planting anything in the soil without any roots formed yet makes the plant susceptible to rot, so there are a few things to consider in order to set yourself up for success.
- Soil: When caring for succulents, it’s important to use a well-draining potting soil, but even better, a succulent-cactus mix. If you are choosing this propagation method, it’s vital to use a dry succulent-cactus mix.
- Light: The succulents must have very bright light, but not total direct sun.
- Temperature: It’s best to keep them in a warm place when the roots are starting out.
- Water: The soil should be kept slightly dry to avoid rot, but the cutting will still need water. But don’t fully water for the first few weeks; only mist once per week.
Pro Tip: Allow the cutting to callous over for a day or two before planting it in soil to heighten your chances of success.
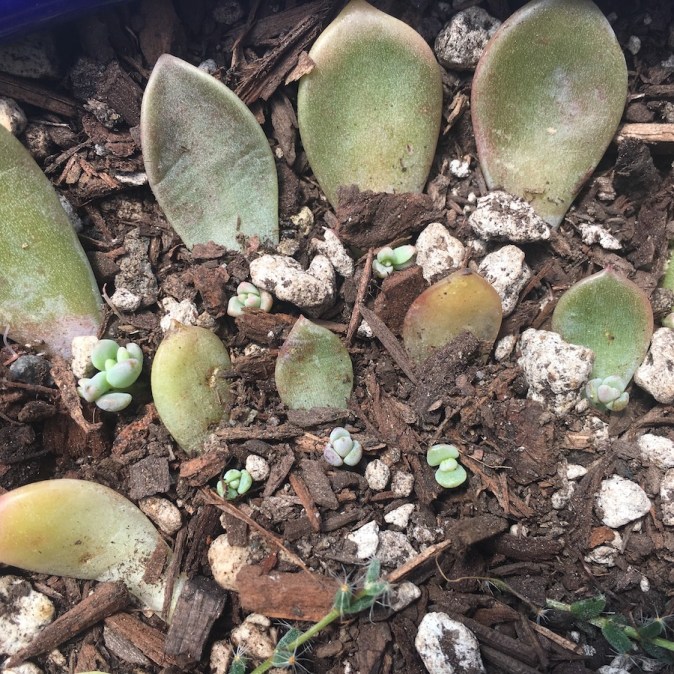
LEAVES:
When I say plant the individual leaves in soil, I don’t mean the whole leaf. That is sure to rot the whole thing. I mean just the tip of the leaf, angled. Like this:

This will help the roots establish themselves more quickly, while still allowing the new growth of the succulent leaf to emerge from underneath the soil surface sooner (since it is planted so shallow). Eventually the leaves will shrivel up, leaving the new growth.
HEADS:
The following is a video clip of my Echeveria ‘Black Prince’ head cutting that I had stuck directly into soil. I cut it off of the main stem since the plant was stretching. Read this post to learn about how to save stretched-out succulents, but first, finish this one!
STEMS:
I had to propagate my Sedum kimnachii recently, because it looked like this stringy mess:
Before, Sedum kimnachii
I did so just by cutting off the stems and planting them in soil with absolutely no roots on them. I pulled off the leaves that were left on the part of the stem that got planted.


So, before I continue, this is the perfect place to interject with my personal story about having confidence while propagating. A few months ago, one of my succulent planters was full of root rot, mold, and mealybugs. It was a disaster. I ended up propagating everything that was in it, and the whole time I was working on it, I wasn’t sure of myself. It seemed like such a daunting task. It was an incredible overwhelming mess, and the plants had been stressed for months. I wasn’t sure if it was going to work out or not. I wanted to cry. But it was either throw away all the plants (which I would never do), or give them a chance. I was expecting no results. I just followed my own soil, light, temperature, and water rules that I listed above. Well, just over two months later, I realized that all of the plants had propagated perfectly. They had healthy white roots, and they were root rot, mold, and bug-free. It couldn’t have turned out better. I was proud of myself. But then I thought, “Wow, I was so hard on myself, but all along I did what was exactly right. I need to do it like this every time!” That’s when I learned that confidence will go a long way. I nursed those plants back to health, and now they are living in the most optimal conditions.
Here’s a little 1 minute video I put together about the planter:
You can tell how distraught I was at first, right? It was definitely overwhelming to deal with all of that, but my efforts paid off in the end!
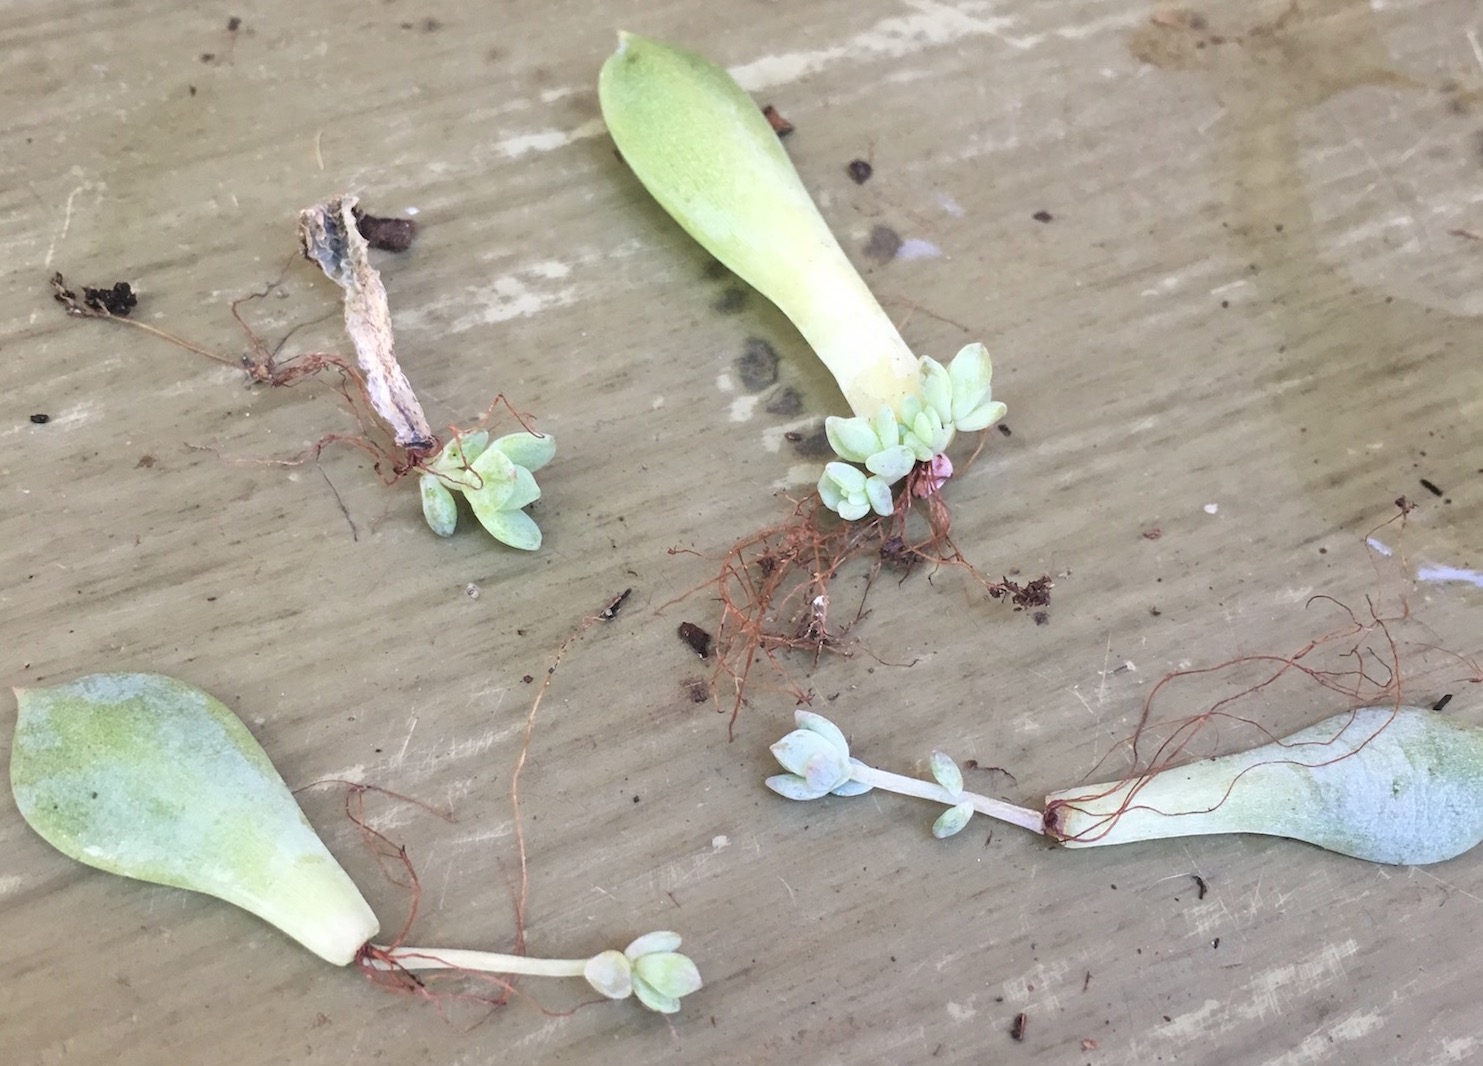
Leaves, Heads, and Stems Laying On Top of Soil, Unplanted

This is my favorite method for leaf propagating, because I get to make fun mandalas when I do it! If you’ve never made a succulent leaf propagation mandala, try it! It’s so meditative! Unlike the other technique above where you plant individual leaves angled down in the soil, you can see exactly what is going on. I love knowing what stage my succulent cutting is in.
I wrote a blog post about How to Save Stretched-Out Succulents. In that post, I talk about how to fix etiolated succulents, and I use an example of my Echeveria “Black Prince” when it wasn’t getting enough light. These are some of the propagations from that project. I tried propagating them during the off-season outside in the cold (this is California though, so our winter low where I live is about 30 degrees), and they didn’t do anything from November to February. Succulents can be propagated any time of year, but they do go slightly dormant during the colder months. These were not only in a semi-dormant state, but they weren’t in the best growing conditions for propagation. Almost immediately after I moved them to my greenhouse, these cuttings finally started sprouting!

In Water

Aeonium water propagation
Leaves, Heads, or Stems Placed into a Vessel of Water
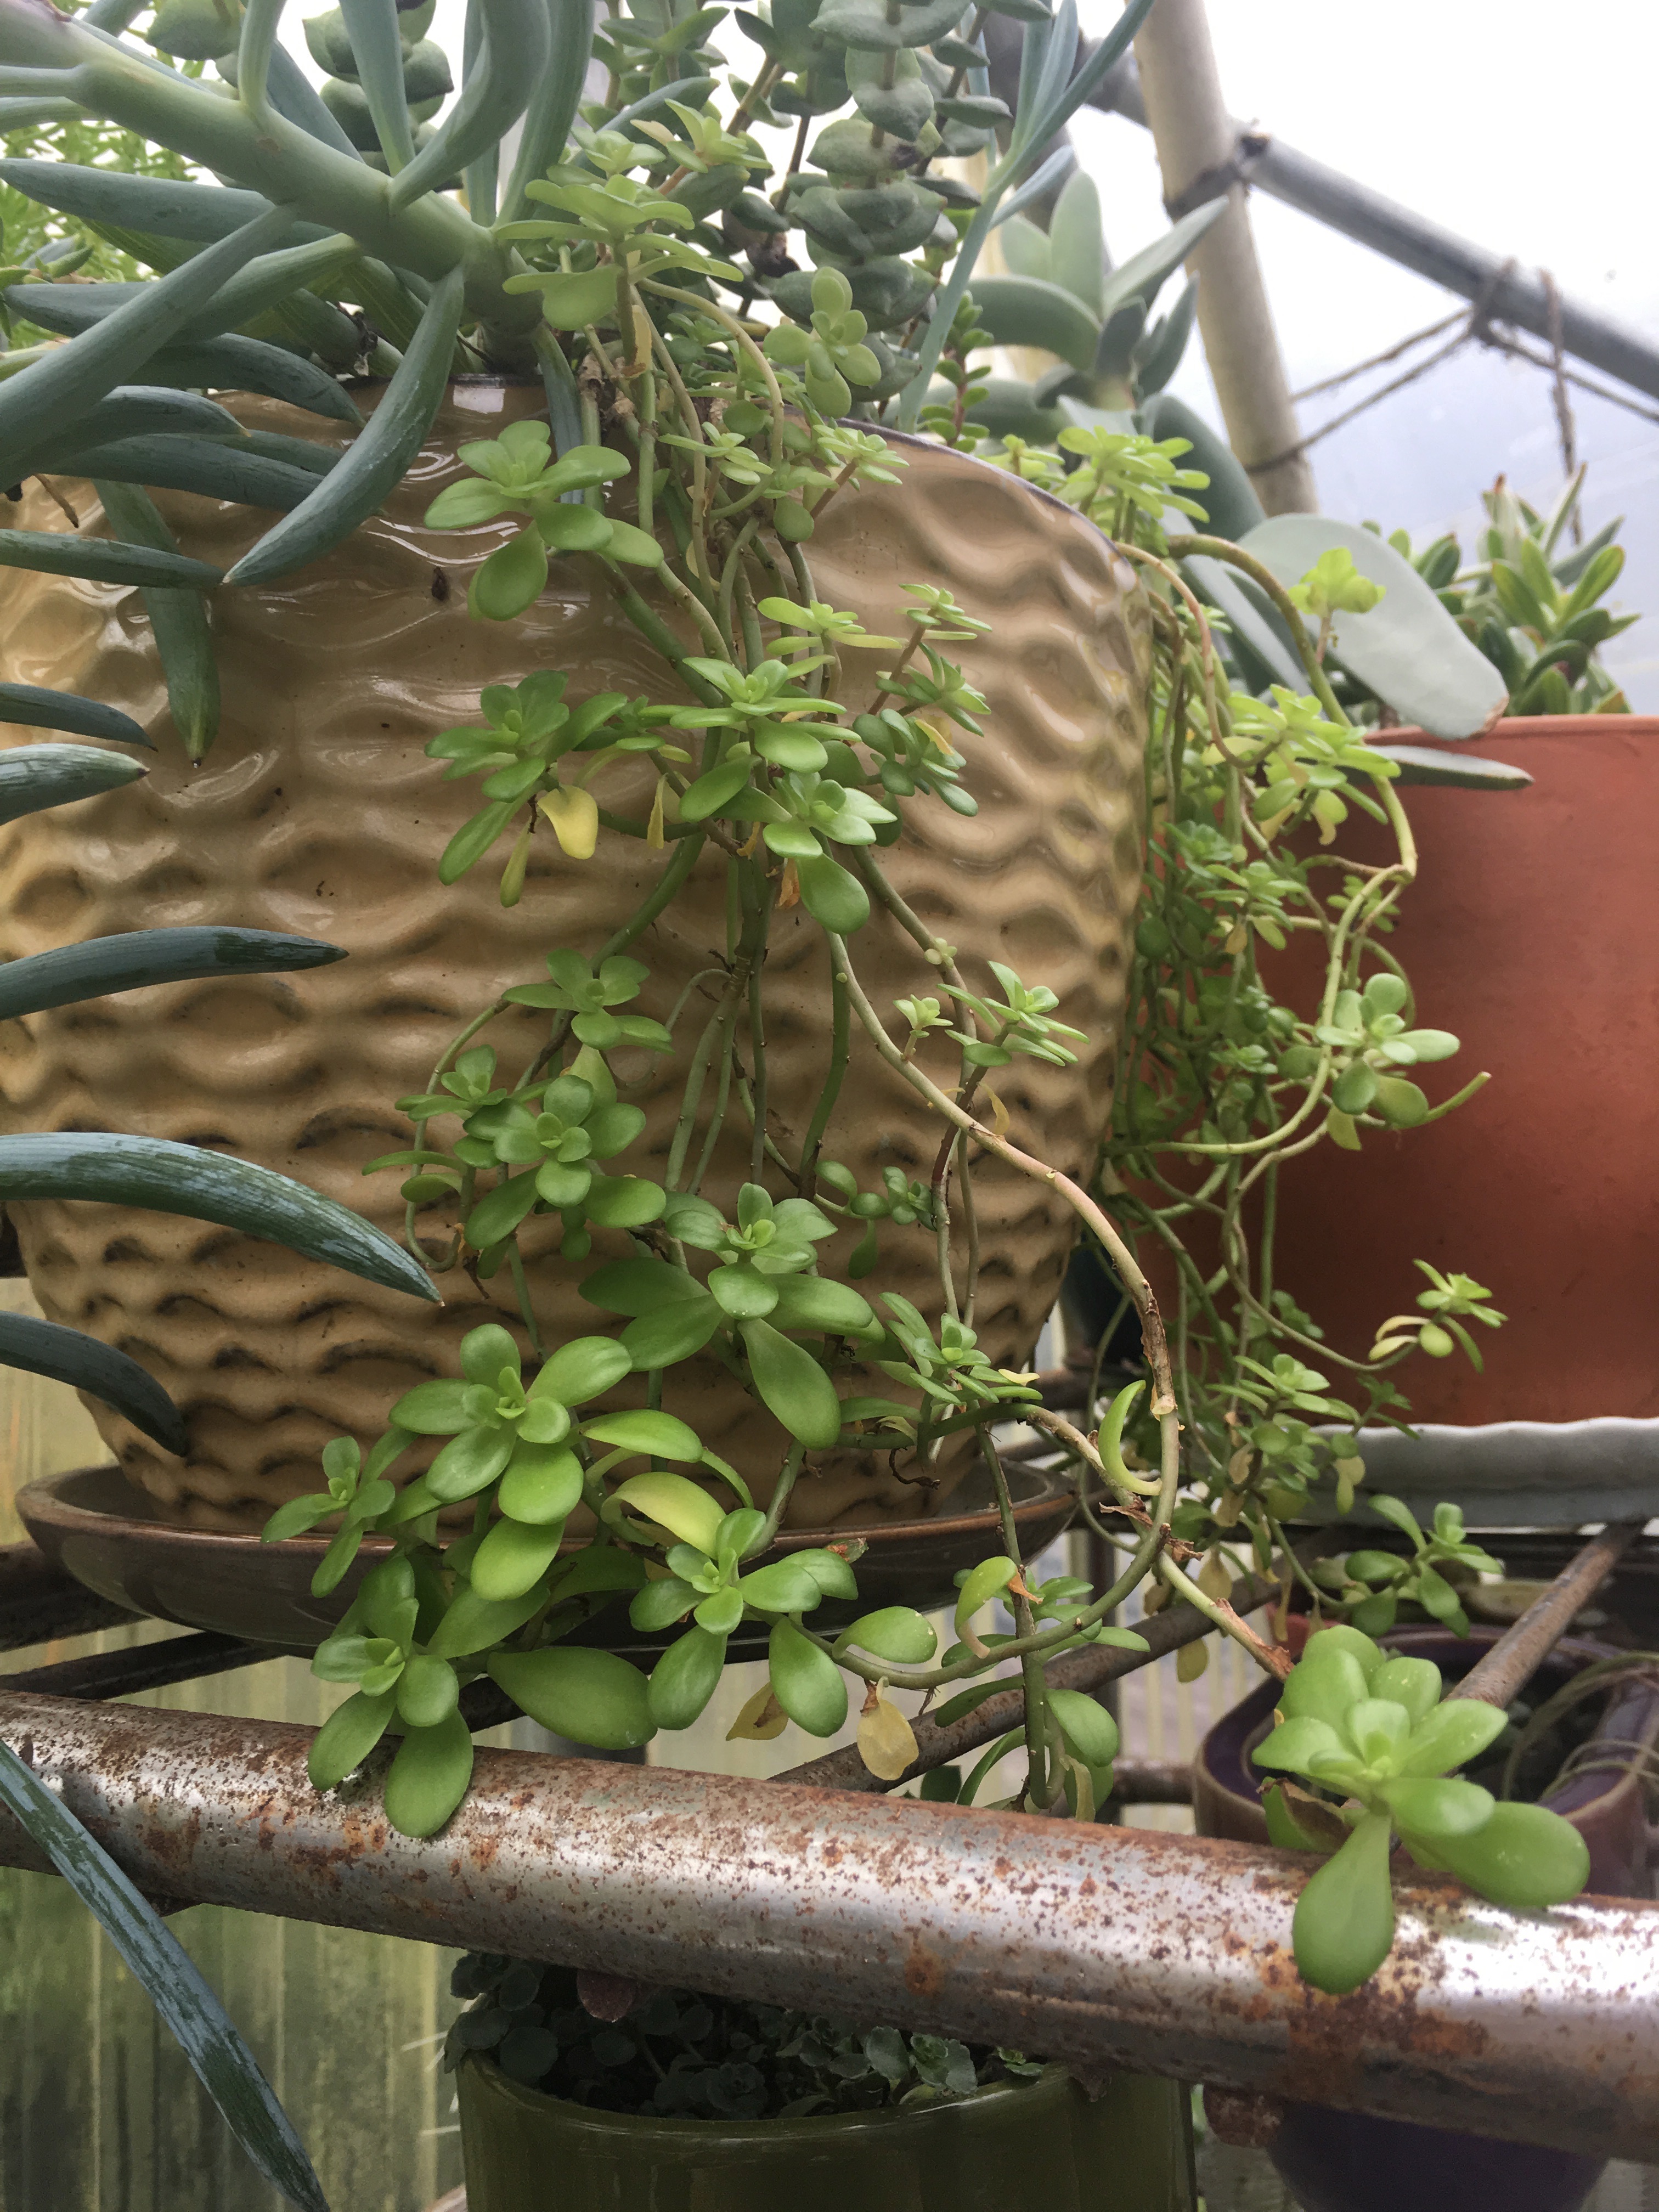
I use water propagation all the time for my plants, but to be honest, when it comes to succulents, I’m not a huge fan of this method. It works to an extent, but I find it counterintuitive. Over-watering is one of the main concerns when it comes to succulent care, so I don’t like the idea of sticking any part of a succulent in standing water for very long. The amount of time it takes for a succulent to grow roots in water is usually long enough for the stem to rot. Since succulents are susceptible to root rot, when you partially rot the stem by propagating it in water, it’s already half way to root rot once it’s planted in soil. Also, keeping the succulent in water makes the environment around it very moist and humid, but most succulents prefer dryness and low humidity.
I use water propagation for succulents when I’m in a pinch and don’t have a chance to plant it in the moment. I use water propagation in succulent propagation experiments. That’s about it. I use water propagation for mostly everything else, though!


Air


Leaves, Heads, or Stems Left Out Flat, with Complete Exposure to the Air
This is the lazy woman’s way of propagating succulents, and it works wonderfully! Just lay them out on a tray or plate, and wait for little roots to form. The key to this method is keeping them out of direct sunlight. I lightly mist my exposed cuttings once in a while (every 2-3 weeks), but I make sure they stay pretty dry. If the roots form and they don’t have contact with soil, they won’t be able to take up any nutrients, so be sure to plant them as soon as you see little roots.
Here are lovely leaf propagations of my Pachyphytum oviferum, a.k.a. “Moonstones”:


Keep it mind it can take a very long time to see roots emerge on leaf cuttings left out to propagate in the air. Remember, channel patience.

I wish you all the succulent propagation success. Try all of these methods, or just try some, but don’t give up! Remember…
Patience ~ Confidence ~ Forgiveness
Here is the cookbook I excerpted that lovely poem from earlier:

Tassajara Break Book
$15.32
If you have any questions, please don’t hesitate to ask! I’m available for any advice and/or troubleshooting you may need.
For related posts on succulent propagation, see Mad Props for Propagation and How to Save Stretched-Out Succulents.
Did I live up to the title of my post? ; )
~CRK.
If you enjoyed what you read and don’t ever want to miss a post, securely sign-up for my e-mail list here.
All photo rights belong to Cristie R. Kiley. Please ask permission before taking.
Disclosure: This post contains Amazon affiliate links, which means I earn a small commission if purchased, at no additional cost to you. This is to simply offset the cost of running this website. Please note that all of the above statements are entirely my own, honest opinions that are derived from personal experience. I would never endorse such products if they didn’t work or if I didn’t see real, positive results. Buy with confidence!

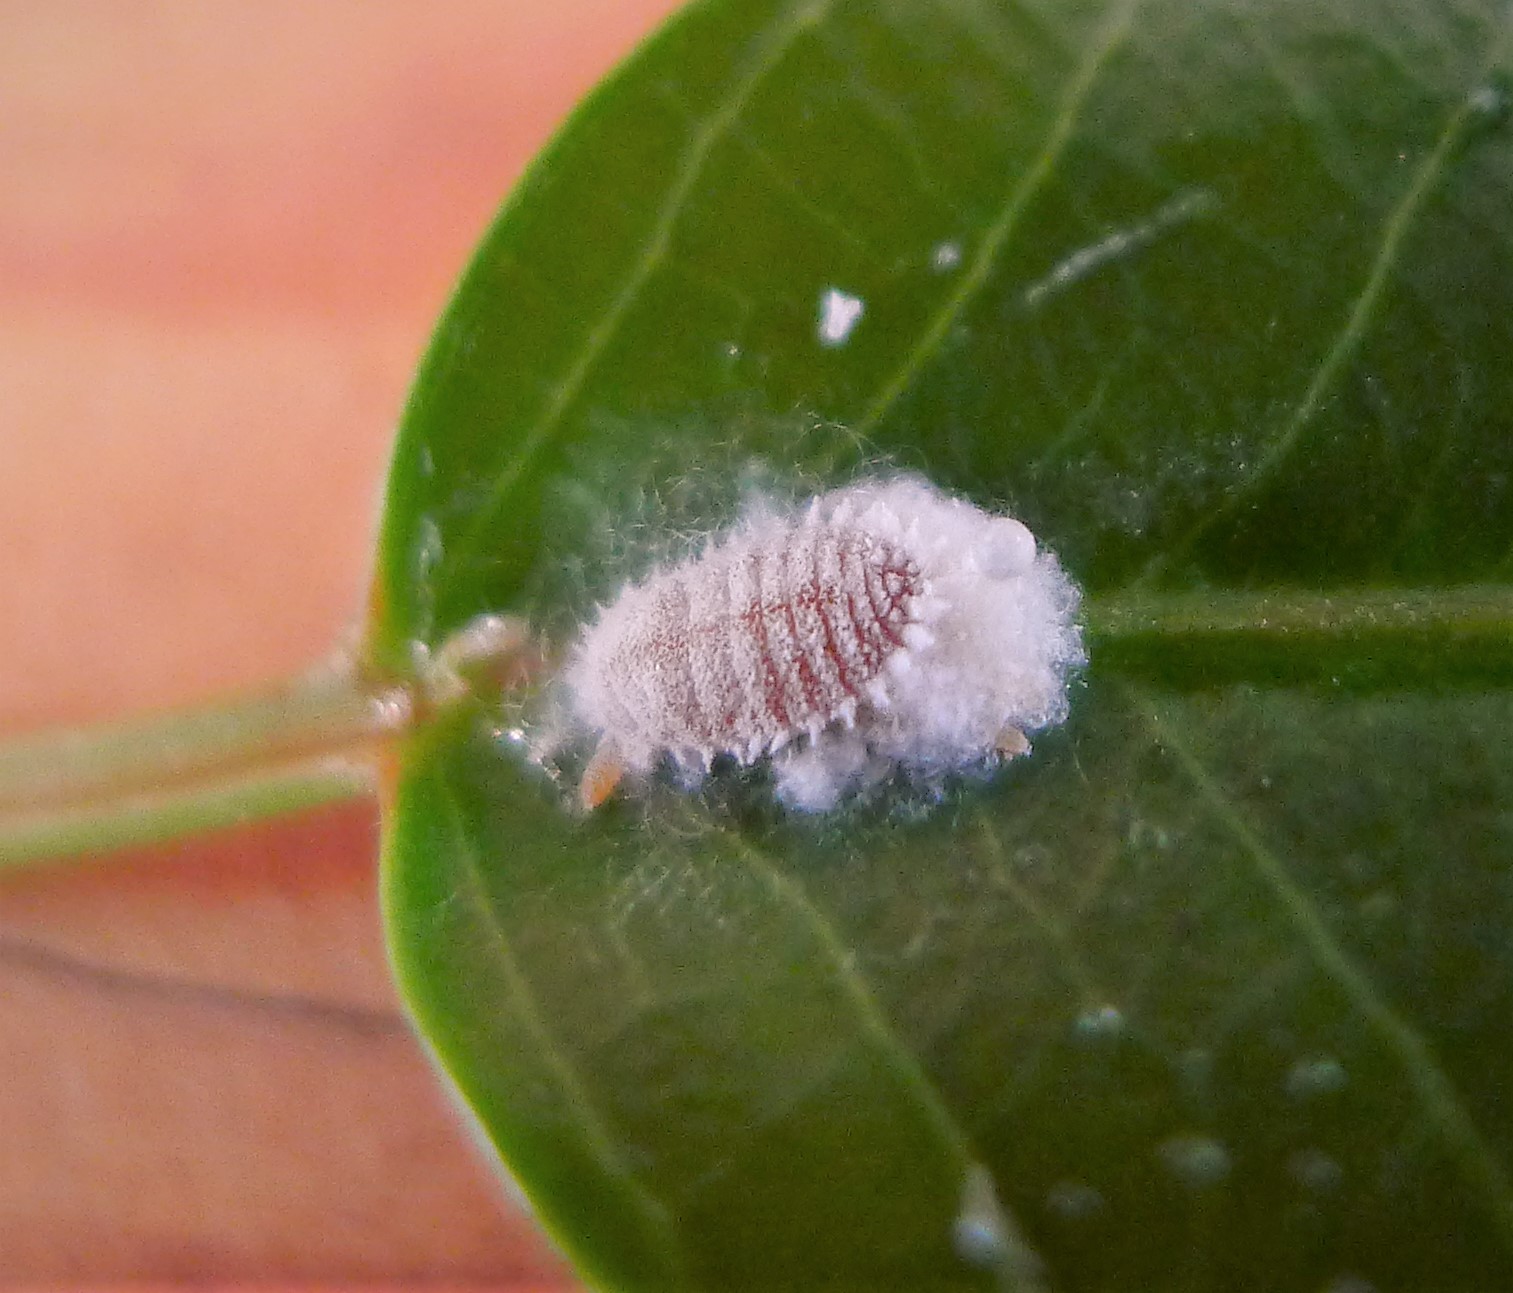
Chances are, even if you haven’t realized it, you’ve had those pesky little white bugs before. Mealybugs. Ugh, what a dirty word! I cringe just typing it. Mealybugs are unarmored scale insects that feed on the plant juices of our beloved plant friends. They suck out the sap from plants, cause wilted and yellow leaves, and decrease photosynthesis. Pierced plant tissue welcomes in infection and disease more readily. The honeydew exuded from mealybugs also encourages mold growth on plants, and the honeydew attracts other insect pests, like ants. They’re quite a nuisance, but they are easy to get rid of if you know how to treat them. I will be focusing on the natural methods of control, involving no artificial pesticides, insecticides, or toxic chemicals.
Regardless of which following method you decide to use, it’s vital to replace the soil when you are treating for mealybugs. Mealybugs often lay their eggs in waxy sacs within the roots of an infested plant, so even if you only see them on the leaves, they are likely in the soil as well. It is best to take the plant out of the pot, brush off all the soil around the roots, throw away all the soil, and clean the pot thoroughly. It’s OK – buying more soil will be worth it.
A lot of people miss this step, which is the main reason the little buggers seem to come back.
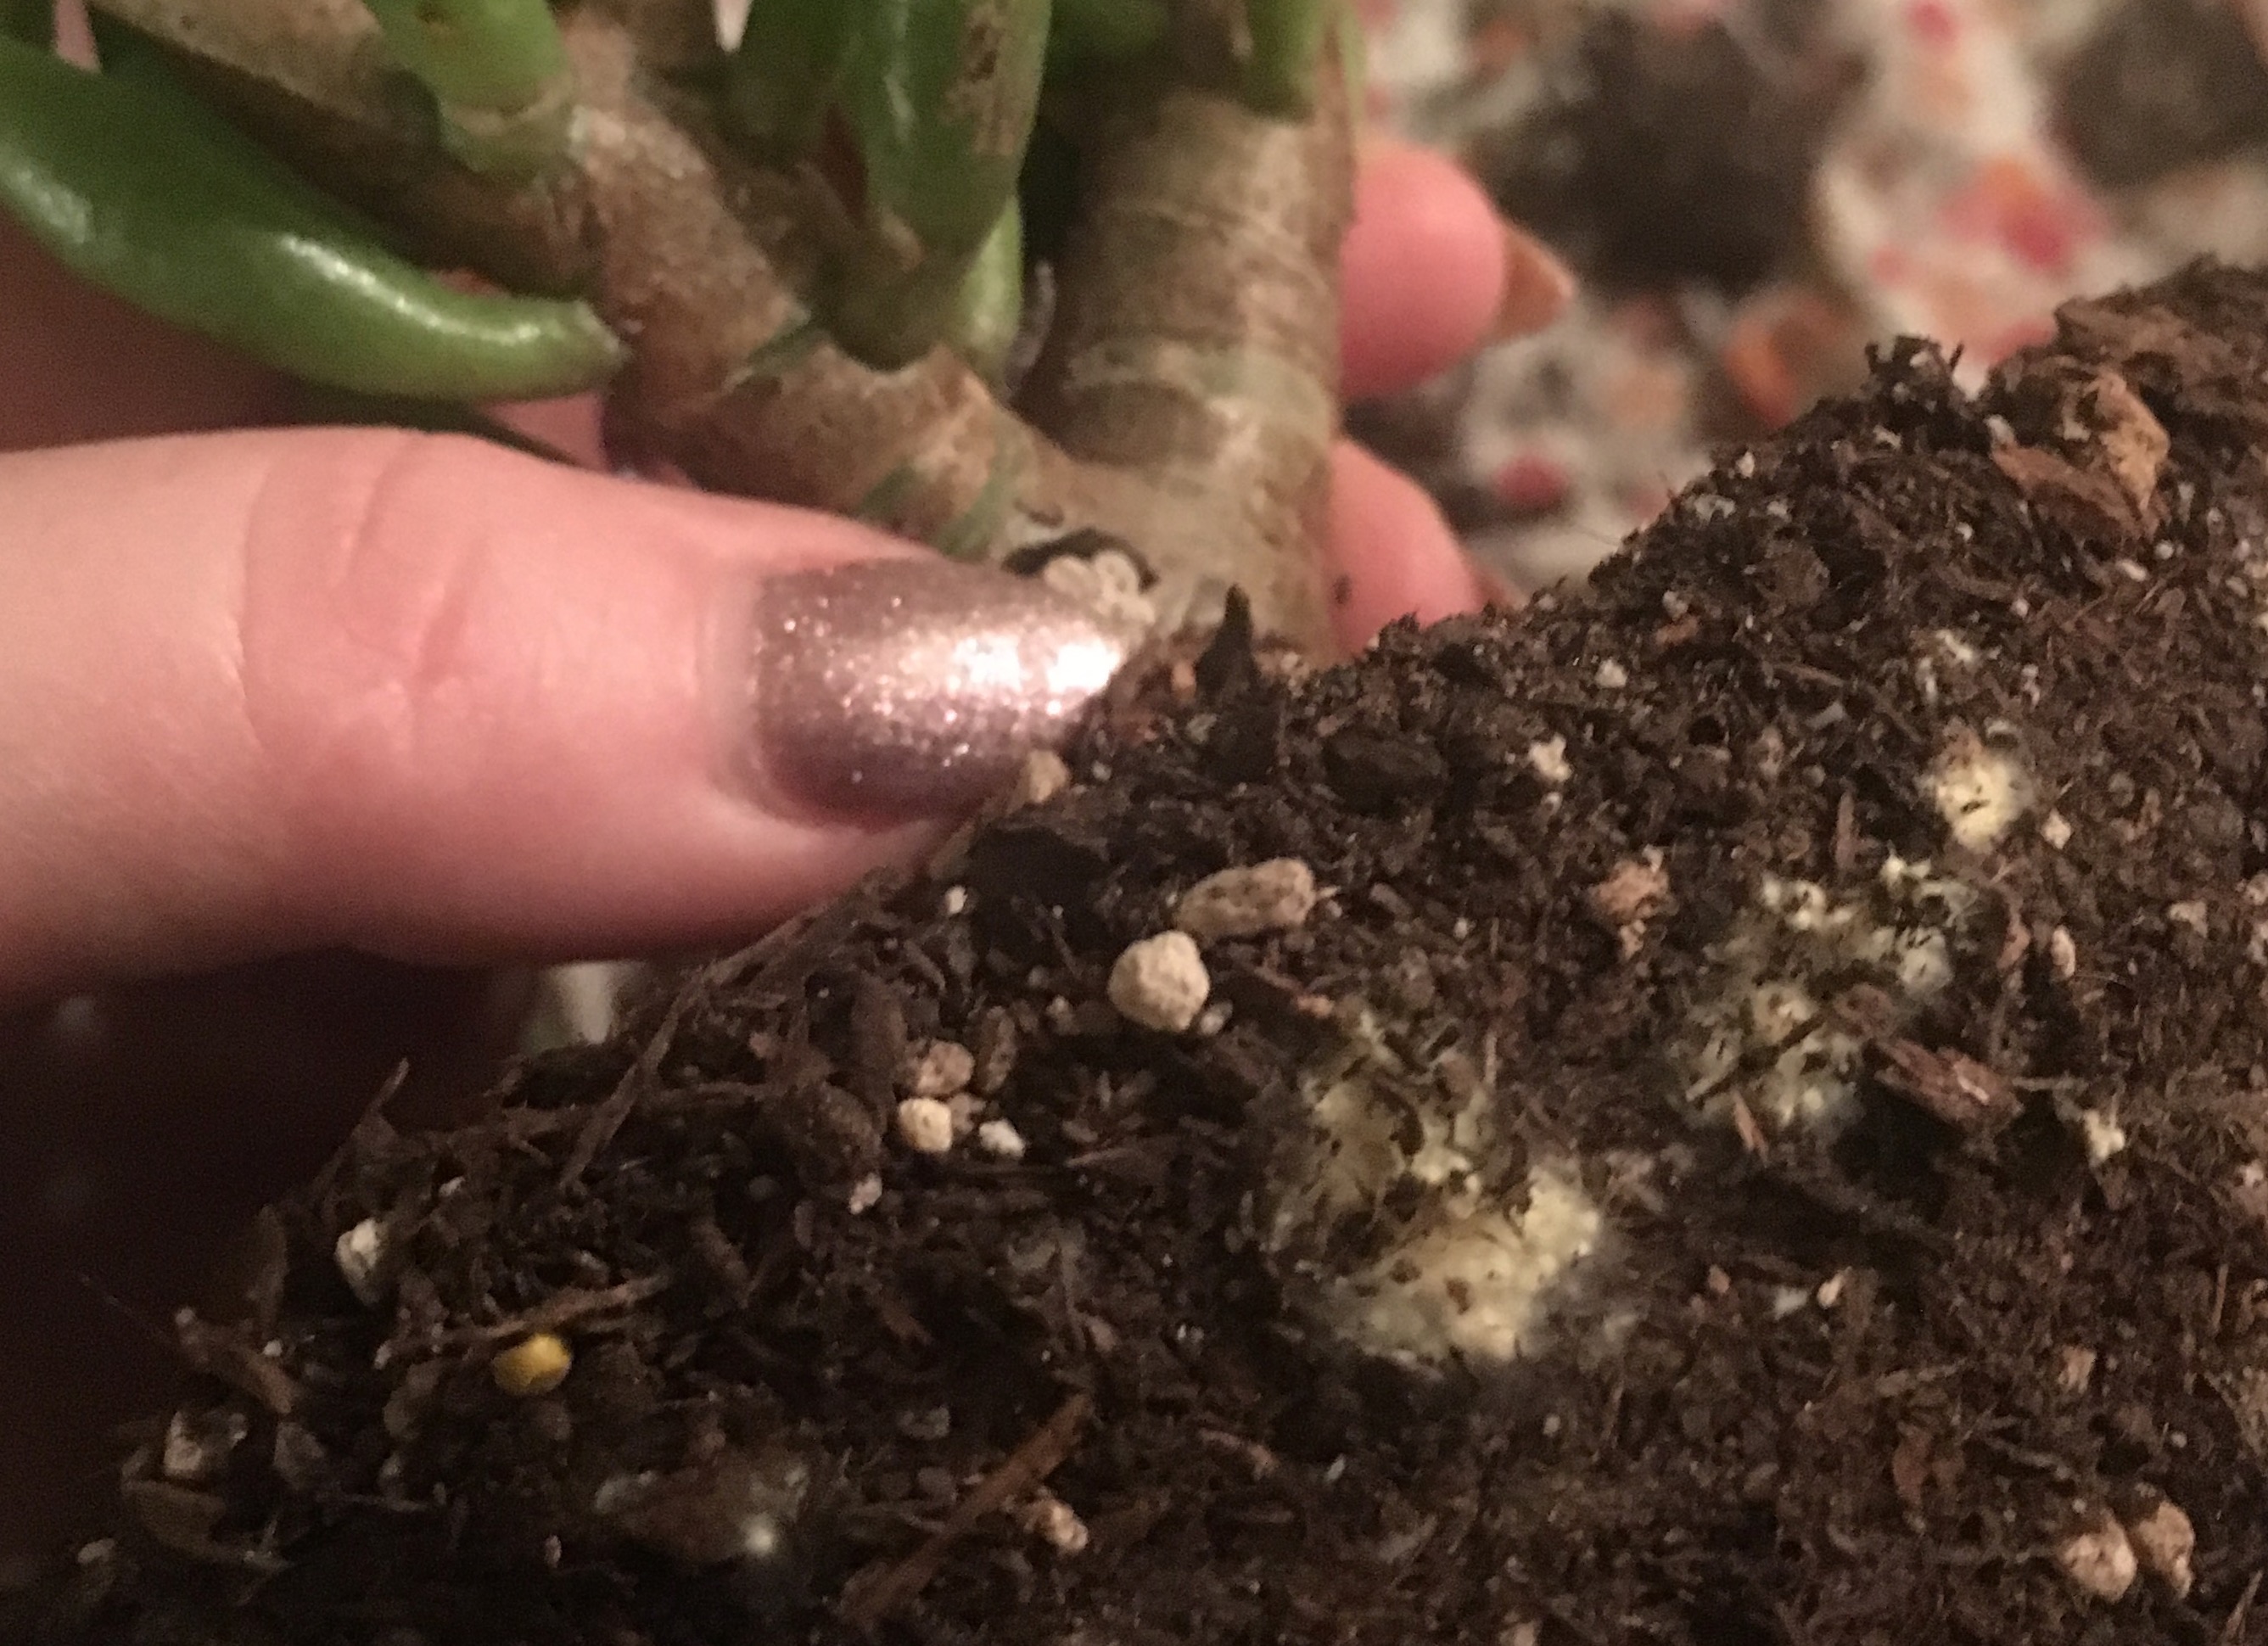
Mealybug Egg Sac In Soil
If I were to just treat the leaves of this infected plant, once the egg sac hatches, all of my prior mealybug treatments would be deemed ineffective. This might be the leading cause to why a lot of people give up, then throw their plants away.
How do you know if you have mealybugs?
Aside from issues with water, light, nutrients, etc., plants will start to wilt or yellow when they are infested with mealybugs. Instead of jumping straight to adjusting your level of care with the plant, use it as an opportunity to check for a pest infestation. It may not be the case (thankfully), but it’s a sign to look out for.
There are several different species of mealybugs, but they generally look like the culprit above. But even if you know what the bugs look like, they sometimes hide out underneath white masses that look like pieces of cotton. It also helps to know how to identity what the egg sacs look like. (Click the pictures to enlarge.)


If you do find mealybugs, make sure you quarantine the plant until you have a chance to deal with it. Mealybugs can quickly spread from plant to plant. Once, I found mealybugs on more than a few plants that were sitting next to each other in a row.
Put it outside at night if it’s not colder than the cold hardiness the plant can take. Cold temperatures will encourage the mealybugs to retreat to the outside of the plant, making it easier to see them when you treat to get rid of them.
Alright, now let’s get into the methods!
Alcohol
Treating a mealybug infestation with alcohol involves manually removing them with 70% isopropyl alcohol (rubbing alcohol), which can be sprayed directly onto the plant. I use a cotton swab to spot wipe away any mealybugs, making sure to check over the plant several times. It is important to power spray the plant with jet-streaming water once all the mealybugs have been removed.
Check out my YouTube tutorial on this method!
If you are worried about the alcohol hurting the plant, don’t worry, it won’t. But if you want to keep your peace of mind, you can cut it with a detergent.
PRO TIP: Do not spray alcohol on tender new growth.
Detergent
Sodium lauryl sulfate (SLS), a surfactant in most detergents, will actually help to kill off juvenile mealybugs, which are almost invisible to the naked eye. Most detergents have this, but a good biodegradable and organic one would be Sal Suds, by good ‘ole Dr. Bronner’s.

Dr. Bronner’s Fair Trade and Organic Sal Suds, 16 oz.
$18.94
Alcohol + Detergent
This is the most thorough method that I have found in treating for mealybugs. Combining efforts is always a good idea. You can make a soapy alcohol solution of equal parts 70% isopropyl alcohol, Sal Suds, and water. Use the same technique as seen in my YouTube video above!
Neem Oil
Neem oil is a naturally occuring pesticide found in seeds from the neem tree. Neem oil is non-toxic… well, non-toxic to humans, pets, and plants. But it is toxic to our mealybug nemeses. A neem oil foliar spray will coat the leaves of the infested plant, entering the vascular tissue of the plant. The next time the mealybugs feel like taking an unwelcome snack on your plant, the neem oil will coat their breathing holes and suffocate them to death. Righteous! It also prevents larvae maturation and can even stop mating behavior. Try the neem oil below if you’re feeling up for it!
Organic, Cold-Pressed, 100% Pure Neem Oil, 16 oz.
$16.99

Biological Control
Ladybugs!

Ladybug on my Crassula multicava
Ladybugs are natural predators to mealybugs, among other pests. Call around to see if any of your local nurseries or hardware stores sell them in bulk. Then you can release them onto your plant to begin the mealy-ladybug battle.¹ If you can’t find them locally, order them here:
1500 Live Ladybugs
$4.50

If your battle turns into a cold-blooded war, you can bring out the big guns! The mealybug is no match to the Australian Ladybird Beetle, Cryptolaemus montrouzieri, a.k.a. “Mealybug Destroyer”!

Mealybug Destroyer
$33.74
All of the above methods can be used to treat aphids as well.
Some other common plant insect pests include spider mites, scale, whiteflies, and ants. Ants won’t necessarily harm your plants, but it is important to keep any ant population in check, because ants farm both aphids and mealybugs. They share a symbiotic relationship. The mealybugs and aphids exude a honeydew sap, which the ants find quite delicious. The ants in turn help protect the aphids and mealybugs. Ants like dry, warm conditions, so be sure to not let your pots outside become bone dry (even succulents).
A few years ago, I noticed a bunch of ants in a succulent planter box I had outside that I didn’t water too often. Left untreated, I ended up with a tiny farm of aphids shortly thereafter. Needless to say, that was my first experience dealing with an aphid crisis. In the end, I won.

Now, when I notice ants, I force them to scurry right away. I have tips on that too if you care to know!
While I was doing my drainage hole video, I didn’t even realize this pot had mealybugs, until I was editing the video and saw the bottom of the pot on my computer screen! I quickly took care of it after that! If you look closely, you can see a mass of mealybug eggs collected at the bottom of the drainage hole.
Well, I hope this helps! But I especially hope it helps save plant lives!
There is no need to throw out plants when you find mealybugs (or aphids) on them! Plant lives matter too! We don’t euthanize our pets when they have fleas, do we? Treat plants the same way. Just because there’s an unsightly bug on your plant, doesn’t mean you can’t fix it. At least try. And as always, I’m available for any questions!
Much love!
~CRK.
If you enjoyed what you read and don’t ever want to miss a post, securely sign-up for my e-mail list here.
¹ I absolutely love this post from Practically Functional on releasing ladybugs in the garden. Not only is Jessi knowledgeable with great photo documentation, but she is so poetic about her experience.
Disclosure: This post contains Amazon affiliate links, which means I earn a small commission if purchased, at no additional cost to you. This is to simply offset the cost of running this website. Please note that all of the above statements are entirely my own, honest opinions that are derived from personal experience. I would never endorse such products if they didn’t work or if I didn’t see real, positive results. Buy with confidence!

You might be wondering by now, what does “xylem” even mean? And why the “rising”? Allow me.
XYLEM
xy·lem
/ˈzīləm/
noun, botany
1. The vascular tissue in plants that conducts water and dissolved nutrients upward from the root and also helps to form the woody element in the stem.
(There’s also the “phloem”, but we won’t get into that here.)

Mendocino Coast, California
Since the xylem only moves in one direction (upward), hence the name Xylem Rising. The “rising” also signifies personal and spiritual upliftment, rising above, enlightenment, and positivity. The xylem gives plants support, structure, and helps keep them rooted in the ground. Metaphysically, this translates to me as being grounded in the mind, body, heart, soul, and spirit.
So not only is this name scientifically accurate, it also means something very personal and sacred to me.
I see Xylem Rising as a way to describe the learning process, and in particular, about plants. Knowledge is growth. Knowledge is power. Growth and power are both uplifting.
Also, it works really well to describe some of the plant home decor items featured in my up-and-coming online shop!
May we all stay connected to the Earth and feel the ground on our feet, the dirt in our hands, and the peace in our hearts when we’re close to Mother Nature. Let us be grounded so that we can grow tall with compassion for others and self, and let our spirits rise high.
~CRK.
If you enjoyed what you read and don’t ever want to miss a post, securely sign-up for my e-mail list here.
All photo rights belong to Cristie R. Kiley. Please ask permission before taking.
