
Sometimes certain plants need haircuts. Just trims though. Like I tell my stylist, “No hack job please, just a light dusting”. I always hate removing material from the beloved plants that I spent so long watching grow into long luscious locks of greenery. But when necessary, it’s for the best. Pruning encourages bushier growth, and some plants can get lanky and lose their fullness. A lot of vine or trailing-type plants are susceptible to this, like Pothos/Epipremnum, Philodendron, Scindapsus, “Wandering Jew” (Tradescantia), etc. Which “Wandering Jew” am I referring to, exactly? The one with the identity crisis.
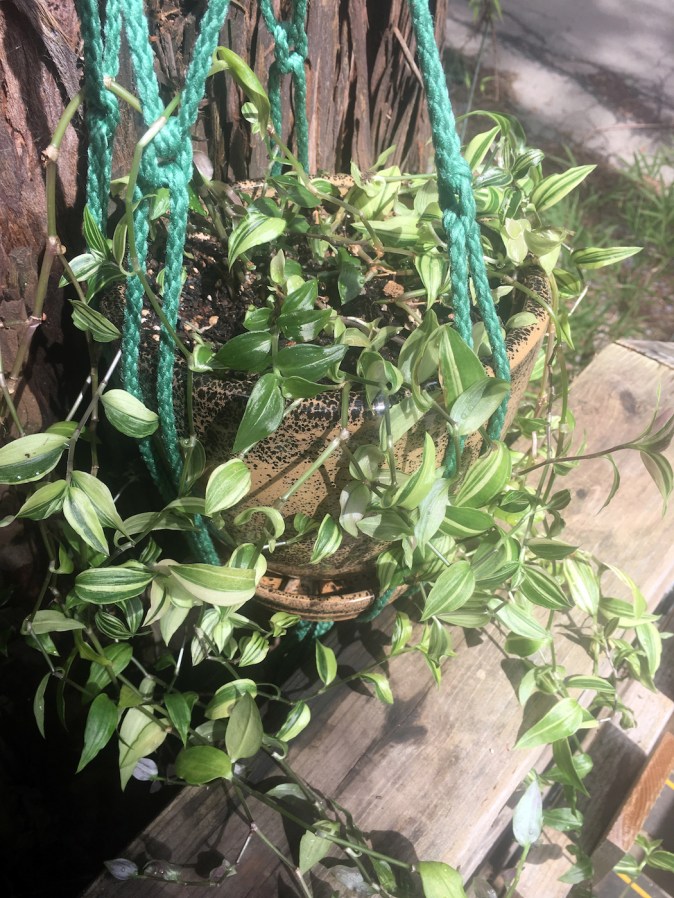
Here’s my spindly Tradescantia fluminensis ‘Variegata’ before its visit to the salon.
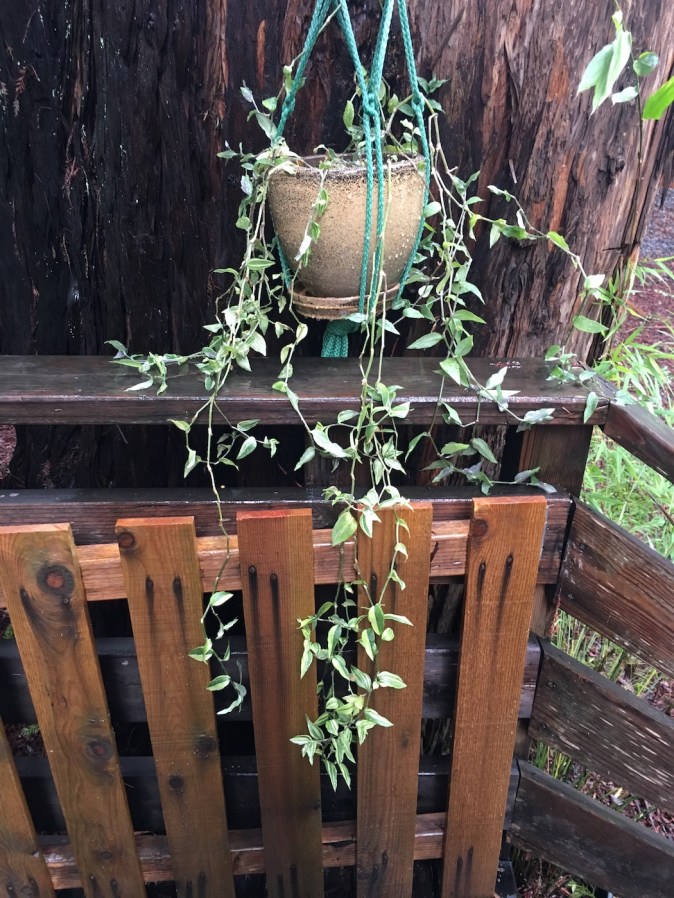
This plant was far too grown out, with almost no foliage at the top. It was rocking that balding hippie look.
So, I got to town with my pruning shears and took off the bulk of the outgrowth. I didn’t just throw out the pieces I cut off though (of course not!); I put them in water to root. Whenever I snip, I save.

It’s easy to propagate most plants in a bottle of water. No rooting hormone needed. All you need is a good pair of scissors like the ones below, a vessel that doesn’t leak, and a sunny windowsill.

Fiskars Steel Pruning Shears, $9.97
(The best pruning shears ever!)
I just so happened to have cuttings of the same plant that I had already propagated months prior, and I planted those at the same time as cutting off length at the bottom. This will help give it more immediate fullness, before new growth is encouraged.
Established roots on Tradescantia cutting.
This is how it came out immediately:


Then I waited.
About one month later…

Not too shabby!
Once the cuttings that I had previously propagated formed roots, I planted them to fill the plant out even more.
Just look at that fullness!
But wait, it gets better.
Another month goes by…
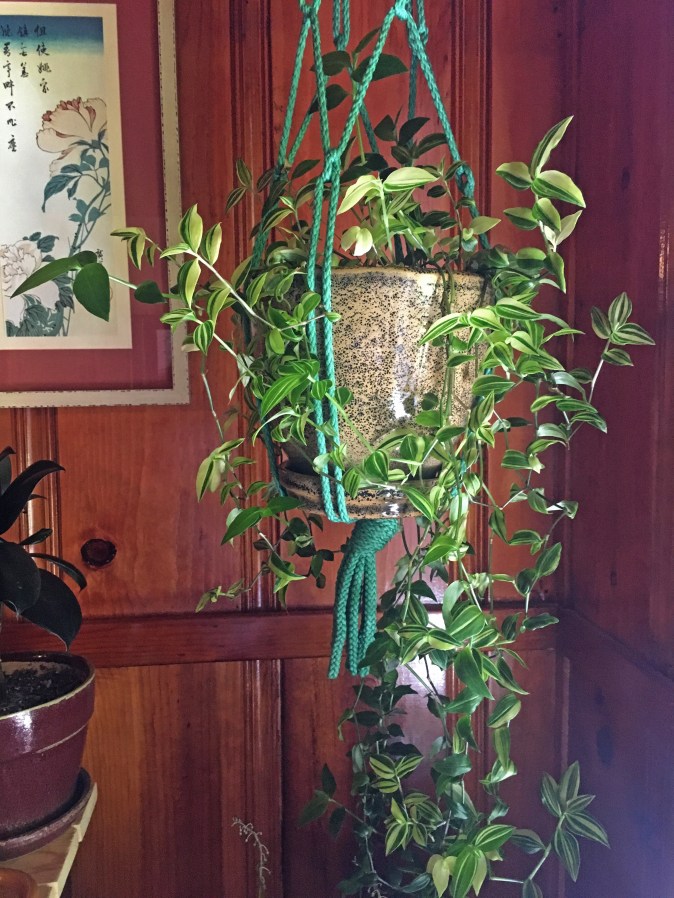


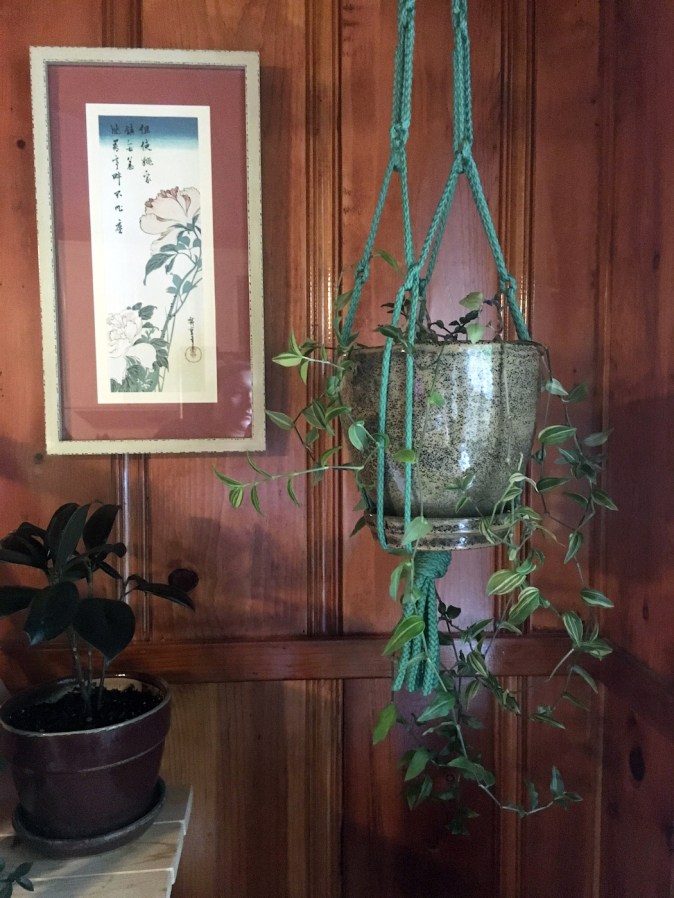
We’re back in business! The “Wandering Jew” is no longer wandering yonder. Of course, this process will need to be repeated in about a year or so.
Three month progress due to trimming to promote growth:


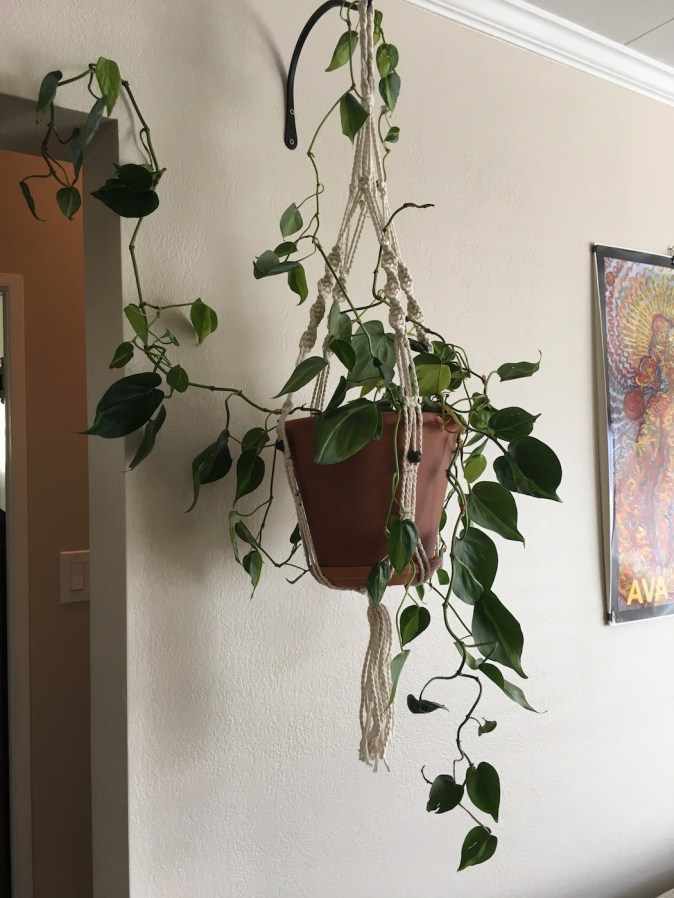
Let’s take a look at a little history of my Philodendron hederaceum ‘Brasil’. It’s been around the block a few times.
This is when I first got it. Full, large leaves, and healthy.
March 2015
Then I drove it across the country from Philadelphia to California during the fall of 2016, and it ended up looking like this.
After Cross-Country Move, 2017
Sadness. Not only was this plant stressed from the move, but it was also suffering from lack of nutrients, water, light, and maintenance, e.g. pruning. If growing conditions are too dark, the stems will start to get spindly. It’s also important to trim off cuttings here and there to promote bushier growth. After a while the plant can get lanky. If you notice that any of your vines are growing significantly smaller leaves, it’s time for a trim.
So, I took off a ton of cuttings, and propagated them in water.


Some made their way into their own pots.
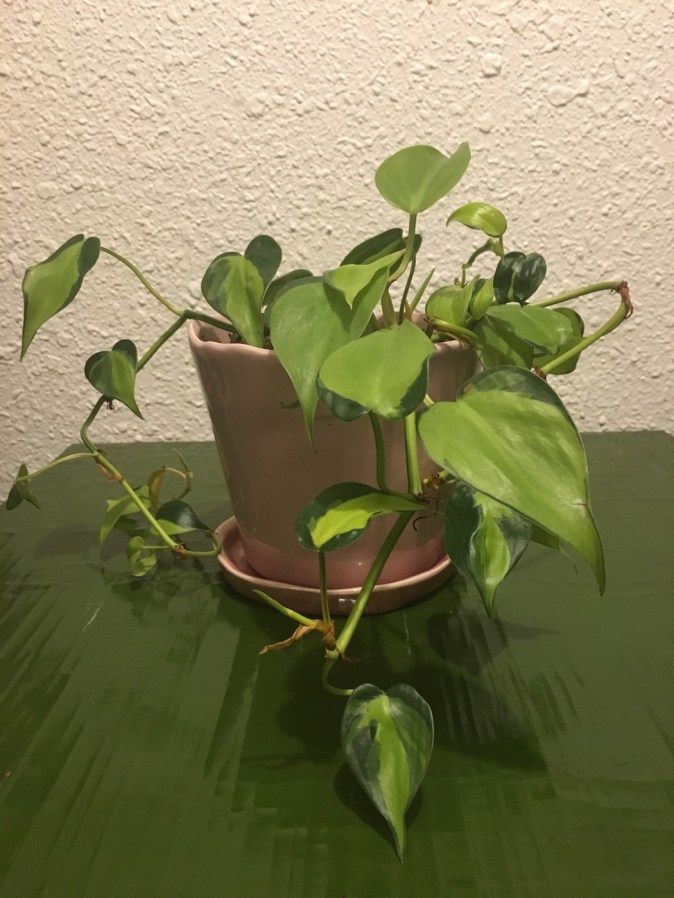
Now, every single propagation from the old pot is planted back together where they all originally came from, and it looks a little something like this.

March 24th, 2019
Four years later, this is same exact plant. It’s been through a lot. It may not have as large of leaves as it did when I first got it, but it is full! I know it may seem counterintuitive, but this was achieved from cutting it back.
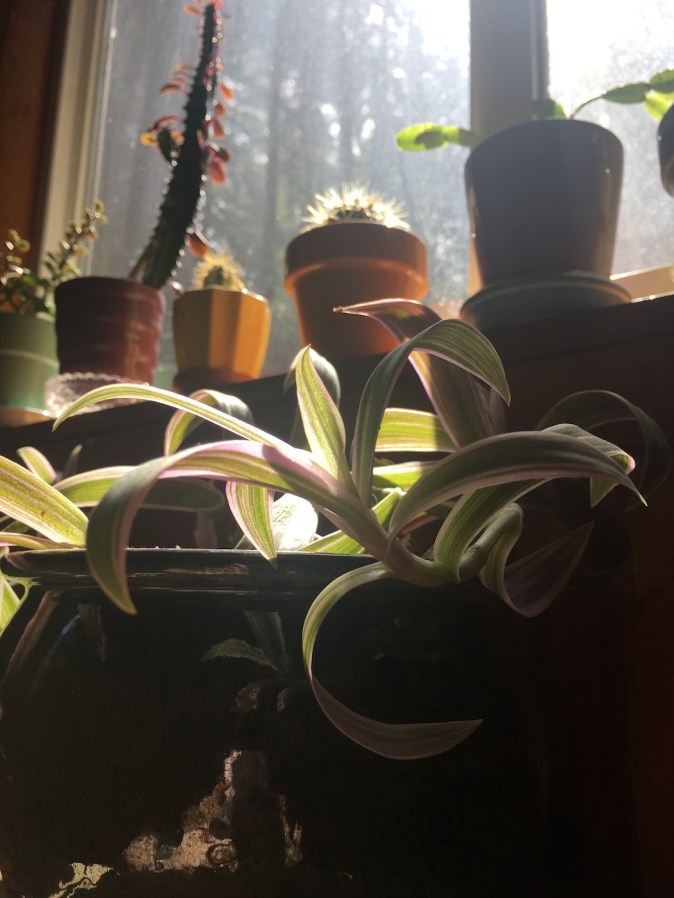
Recently, I propagated my Tradescantia spathacea, a.k.a. Moses-in-the-Cradle plant. As soon as I trimmed it in only two places, I was awarded with all of this immediate new growth!


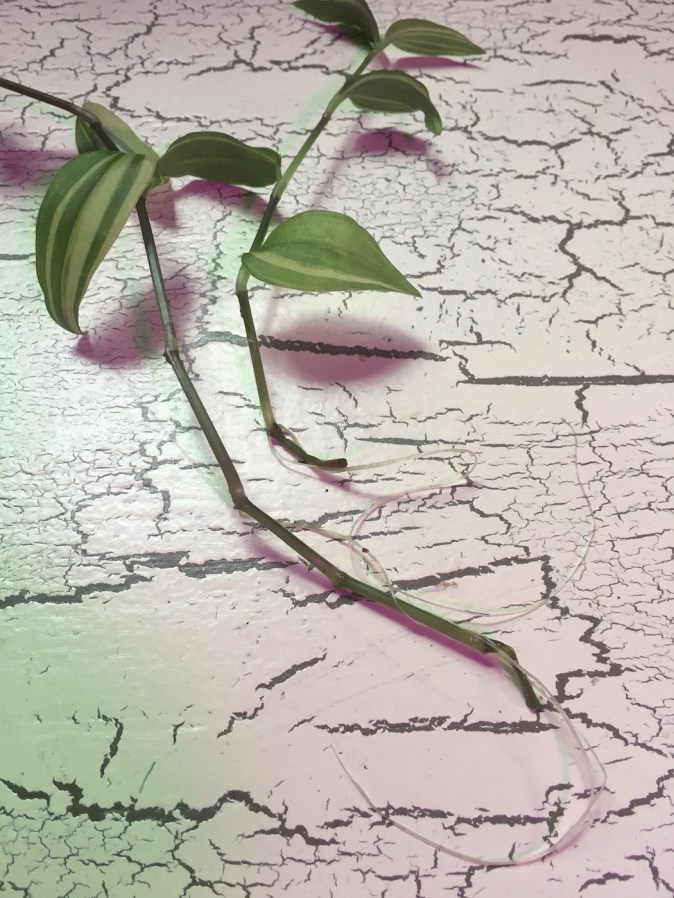
So where do you cut? Wherever you see an aerial root, cut below the node. This will leave the internode sticking out from the plant you cut from, so feel free to cut it off right above the node at the bottom of the internode. When you stick the cutting in water, wherever there are aerial roots, roots will start to grow. Make sure the aerial roots maintain contact with water.
I’ve made a visual diagram for you. You can cut at either place where I drew the red lines on the stem. I would normally cut either one or the other, not both, but cutting both won’t hurt it. If I were to cut this particular stem, I would cut along the bottom red line and make sure that both of the aerial roots I’ve pointed out are under water.

Because I’m a plant nerd, I am fascinated by the science behind this. The main stem (apical meristem) of a plant contains the largest amount of the growth hormone, auxin, than anywhere else in the plant. This actually prohibits growth by any lateral buds, which maintains apical dominance. The buds and aerial roots are dormant. When you cut off a portion of the plant on the main stem, the auxin is no longer produced in that area, which breaks the dormancy of the rest of the plant and promotes bushier growth.
Thanks for reading, and I’d love to hear about your adventures in plant cutting propagation!
~CRK.
If you enjoyed what you read and don’t ever want to miss a post, securely sign-up for my e-mail list here.
All photo rights belong to Cristie R. Kiley. Please ask permission before taking.
Disclosure: This post contains an Amazon affiliate link, which means I earn a small commission if purchased, at no additional cost to you. This is to simply offset the cost of running this website. Please note that all of the above statements are entirely my own, honest opinions that are derived from personal experience. I would never endorse such products if they didn’t work or if I didn’t see real, positive results. Buy with confidence!

I predominately use the scientific names for plants. Why? It’s not to sound smart (although it does help). I use them because for one, they are the plants’ names, and two, to avoid confusion. Common names are thrown around so loosey goosey and are often used to describe totally different plants. Relying on common names alone is tricky and will lead to one person talking about Euphorbia lactea ‘Cristata’ f. variegata (referred to as “Coral Cactus”) and the other person talking about Rhipsalis cereuscula (also referred to as “Coral Cactus”). Two completely different plants, from two completely different genera. These two aren’t even from the same plant family, let alone the same plant order! They aren’t closely related, but they do share a few broad taxonomic commonalities. They both belong to the same kingdom, Plantae. Yes, they’re both plants, you would have never guessed. They also belong to the same phylum, or plant division in botany, Anthophyta. This consists of the clade, angiosperms, which are the flowering plants. They are both eudicots¹ as well, but lets not get too deep in our Biology textbooks here. I can see your eyes glazing over. Let’s just say they are both succulent plants, with the same common name.


Without giving you a full-on Biology lesson, here is a basic plant taxonomy chart I made to give you a bit of context. If you want to nerd out with me, there’s a link that will blow your mind at the bottom of this post.²
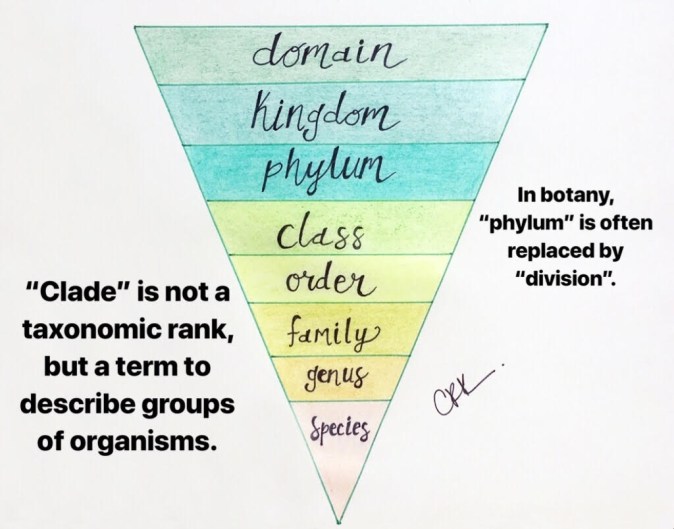
PLANT TAXONOMY CHART, by CRK.
Moving on with the “Coral Cactus” example from above, the common name should not be taken literally. Neither of these plants is a type of coral, and only one is a type of cactus. Common names often describe what the plant looks like, not what it is.
Common names will often imply that the plant in discussion is actually a certain type of plant, e.g. “Lucky Bamboo”. Interestingly enough, Lucky Bamboo isn’t even real bamboo. What people refer to “Lucky Bamboo”, is actually Dracaena sanderiana, a type of Dracaena. Think about the popular Dragon Tree or Corn Plant. Lucky Bamboo is grown in water, but bamboo cannot be grown in water. Trust me, I work at a bamboo nursery. Well… I guess it could be grown in water until it dies from being “grown” in water.


Common names are somewhat useful, because scientific names are less known. Everybody knows Spider Plant. Most people don’t know Chlorophytum comosum. But keep in mind that common names are often localized to certain regions.
A few basics about nomenclature before I continue:
(I apologize in advance if this gives you PTSD from Biology class.)
The genus and species of a plant is always italicized. If a plant has a variety or cultivar, the name is normal typeface and will be in single quotes, i.e. Genus species ‘Cultivar’. Common names are always in double quotes, i.e. Genus species ‘Cultivar’, “Silly Plant Name That Doesn’t Mean Anything”. Also, Genus is always capitalized, while species is not. Since I’m self-diagnosed with OCD, if you pay attention, you will see that I am meticulous about using these distinctions throughout this entire website. Most other websites will not, including ones selling the darn things. There is a lot of misnaming out there, even in professional plant nurseries. The intent of this post is to help clear it up.
You will see on my Plant Education page that I always have the taxonomy listed for plant species as follows:
Scientific Classification:
Order:
Family:
Sub-Family: (sometimes)
Genus:
Species:
Cultivar: (if applicable)
I will always include any known common names as well.
So what’s the difference between cultivar and variety? In short, cultivars are man-made hybrids. Varieties are true forms found in nature. “Form” is synonymous with variety and cultivar.
Sometimes you might see var., f., subsp., sp., and spp. across my site.
| var. | In plant nomenclature, the “var.” in the name stands for variety, a taxonomic rank below species but above form or cultivar. |
| f. | The “f.” stands for “form”, or “forma”. In plant nomenclature, it is secondary to the variety or cultivar. The primary form of Euphorbia lactea ‘Cristata’ f. variegata is Euphorbia lactea ‘Cristata’, which is an all-green form. The variegata form is the same variety (or cultivar in this case), only it has a different leaf appearance. |
| subsp. | “Subsp.” stands for sub-species. |
| sp. | “Sp.” is used when the particular variety of the plant either cannot be identified or need not be specified. |
| spp. | “Spp.” (plural) is used to refer to multiple plants in the same genus, or “several species”. |
Alright, we made it! We’re done with botany semantics. Let’s go back to more examples of common name confusion.
Lets take “Asparagus Fern”. There are multiple plants that share this common name. It could refer to Asparagus aethiopicus ‘Sprengeri’, a.k.a. Sprenger’s Asparagus. Or it could refer to Asparagus densiflorus ‘Myers’, a.k.a. Foxtail Fern. It could even refer to Asparagus plumosus (synonymous with Asparagus setaceus).
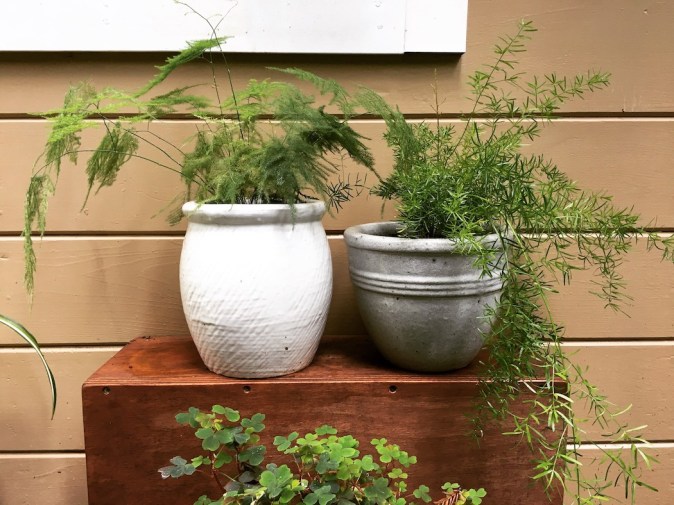


Asparagus densiflorus ‘Myers’
As you can see, these three plants look totally different from one another, yet people still use the same common name for them. All of these plants belong to the same genus, Asparagus, the same family, Asparagaceae, and the same order, Asparagales. You could call them asparagus, but they are not the same as the garden asparagus we all know and love, Asparagus officinalis. They all have a fern-like appearance, but they are not true ferns. Asparagus are angiosperms, or seed-producing plants. Ferns are spore-producing plants. Check out this diagram³ for a visual.

Now this is our culprit, “Wandering Jew”. What a misnomer mess.
At least four species of Tradescantia are called Wandering Jew:
- Tradescantia fluminensis
- Tradescantia fluminensis ‘Variegata’.
- Tradescantia pallida, a.k.a. “Purple Heart Plant”
- Tradescantia zebrina


Also, at least four species of Commelina are called Wandering Jew.
- Commelina africana
- Commelina benghalensis
- Commelina cyanea
- Commelina ensifolia
Both Saxifraga stolonifera and Tinantia pringlei are called Wandering Jew as well.
Do you think Wandering Jew has an identity crisis?
Are you confused yet? No need to be! Use Latin names instead.
We have Carl Linnaeus to thank for starting our system for plant nomenclature when he wrote Species Plantarum in 1753.
Bionomial Nomenclature
bi·no·mi·al no·men·cla·ture
/bīˈnōmēəl ˈnōmənˌklāCHər/noun
BIOLOGY
- the system of nomenclature in which two terms are used to denote a species of living organism, the first one indicating the genus and the second the specific epithet.
Today, The International Code of Nomenclature for algae, fungi, and plants (ICN) is the set of rules and regulations for botanical names. It is governed by the International Association for Plant Taxonomy (IAPT). Their latest publication is the Shenzhen Code, 2018. Fascinating casual read.
I am officially a plant nerd.
Thanks for reading!
~CRK.
If you enjoyed what you read and don’t ever want to miss a post, securely sign-up for my e-mail list here.
With the exception of the source footnote #3, all photos belong to Cristie R. Kiley. Please ask permission before taking.
PS: I love this post about using scientific names from Plants are the Strangest People.
¹If you are a plant nerd like me, read about what classifies an eudicot here.
²If you want to nerd out with me about plant taxonomy, click here.
³Plant classification diagram.

“Ain’t no planter dope as me, I’m planted so lush and green (so lush and so green, green)”. Wait, those are the Outkast lyrics, right?
These succulent planters are the most lush ones I have. Just look at the size of those Blue Chalksticks!
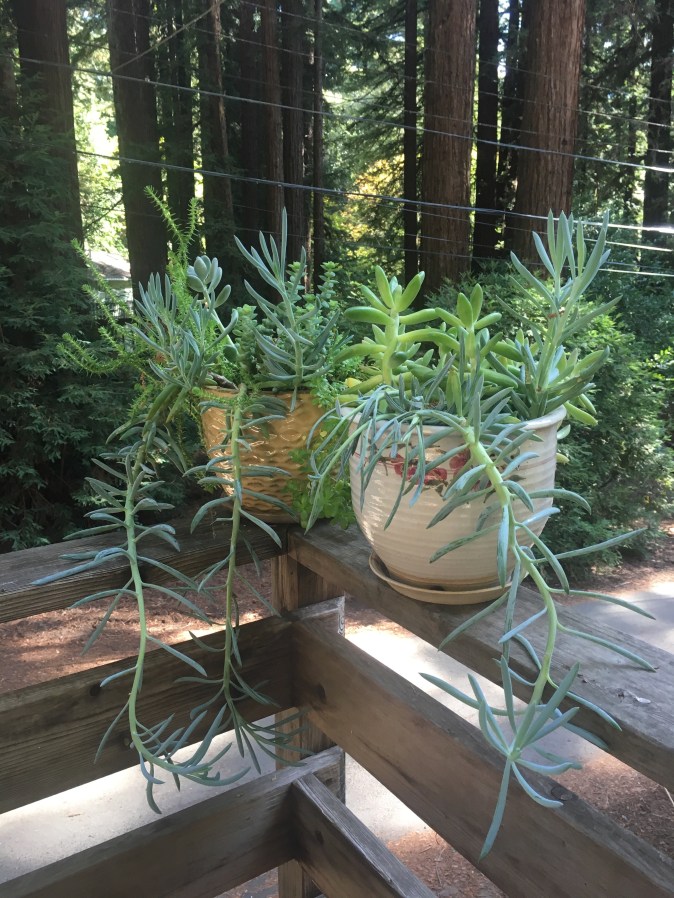
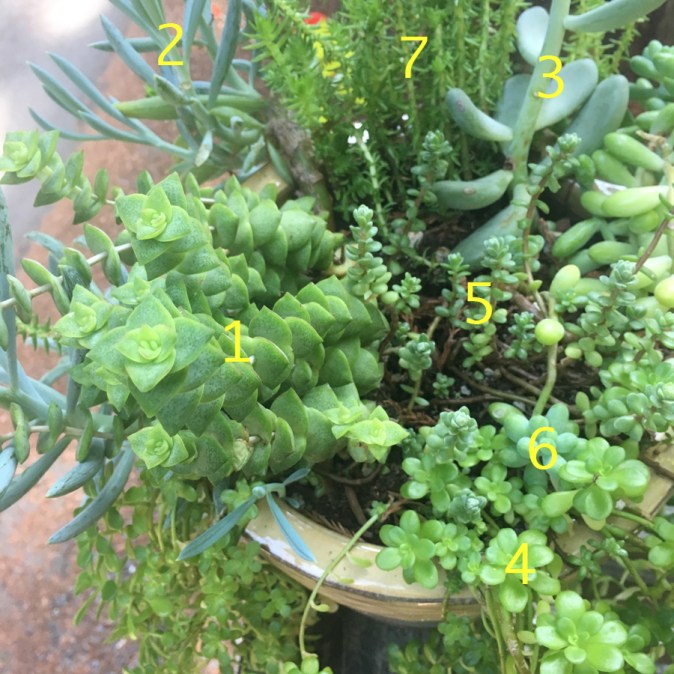
Plants pictured above:
- Crassula perforata
- Curio talinoides var. mandraliscae “Blue Chalksticks”
- Pachyphytum oviferum “Moonstones”
- Sedum kimanchii
- Sedum oaxacanum
- Sedum pachyphyllum
- Sedum rupestre
These planters are among the handful of plants I recently brought to my new greenhouse. Read about the details at Fighting the Winter Blues.

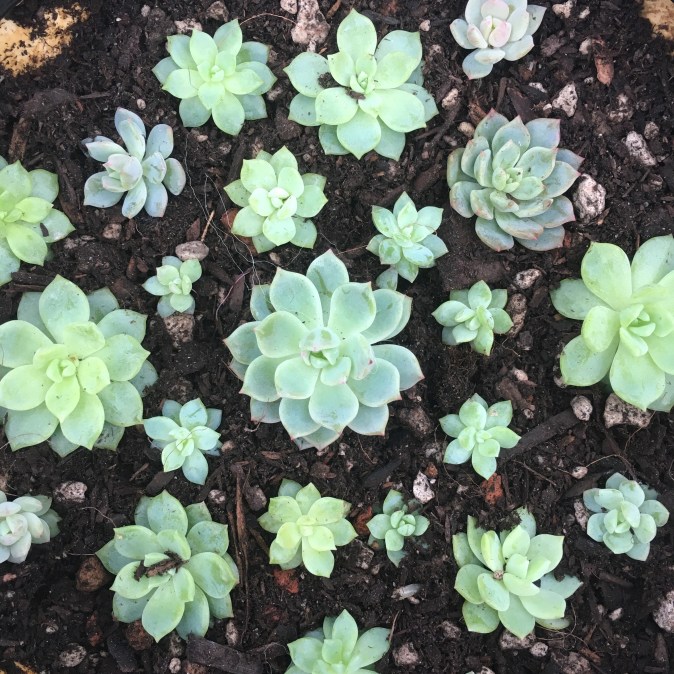
Despite the clever name for this post, green leaves don’t always indicate the best growing conditions when it comes to brightly-colored succulents. Leaf “greening” will occur when they don’t receive enough light, like these ones. They won’t die from lack of full sun, but they will dull to a pale green.
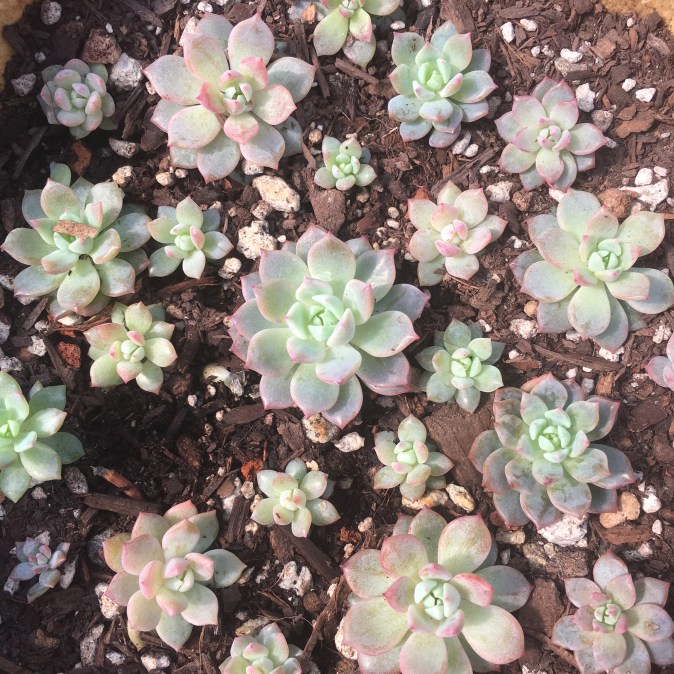
After only three weeks of greenhouse living, my Pachyphytum oviferum “Moonstones” got its lavender tones back!

Pachyphytum oviferum lavender tones
Here is Pachyphytum oviferum before, on the left. And after 2 months of greenhouse living, here is Sedum pachyphyllum, on the right. Notice the blush tones?


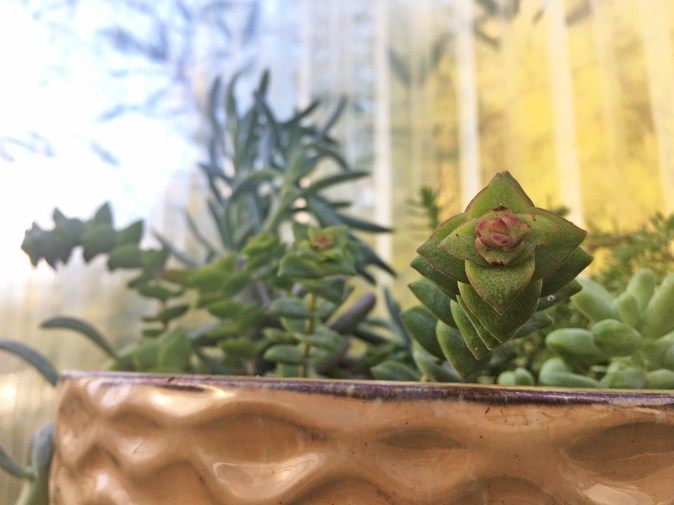
After only 3-4 weeks, the leaf margins of my Crassula perforata started getting their red back as well!


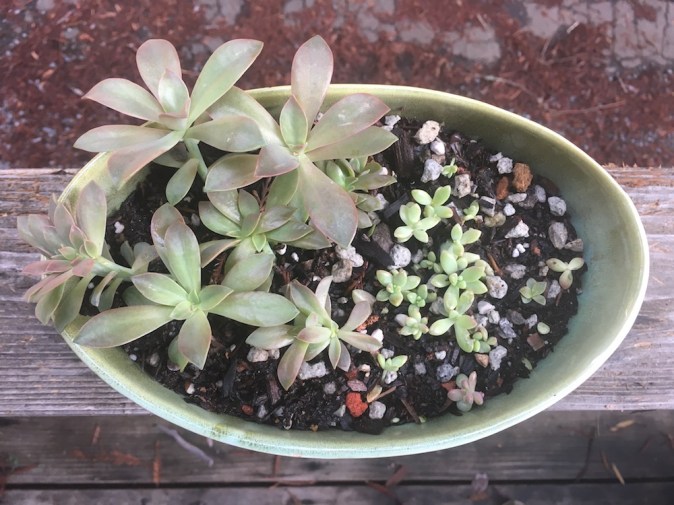
Not only was my Sedum kimnachii dulled to an overall green color from living in a redwood forest, but it was also becoming very stringy. So I easily propagated it by pulling off the heads and starting the plant over. I’m excited to see the beautiful peachy tones.


[later update] 5-6 months later…


These are the same exact cuttings from my Graptopetalum paraguayense:


December 2nd, 2018

February 5th, 2019
March 1st, 2019
Karma, karma, karma, karma, karma chameleon…
The stems turned red and the faded red leaf stripes came back on my Aeonium simsii.


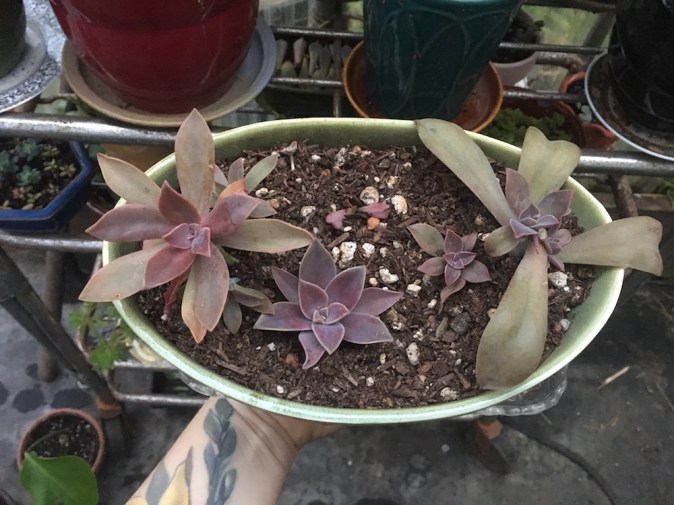
My Echeveria prolifica got its pink tint back!
Isn’t this all so amazing?!
You can only imagine how thrilled I am.
~CRK.
If you enjoyed what you read and don’t ever want to miss a post, securely sign-up for my e-mail list here.
All photo rights belong to Cristie R. Kiley. Please ask permission before taking.
